Those early digital imaging systems were prohibitively expensive -- $100,000 and up. Today, sophisticated programs from Photoshop to basic Internet freeware/shareware imaging software make cloning and a wealth of other manipulation tools affordable and available to every digital photographer.
Basic cloning tools provide the ability to duplicate one area of an image and to exactly place the duplicate (clone) in another area of the same image. Today, most image editing programs include some form of cloning as a fundamental tool. This article will explore the basics of cloning that are common within today's imaging programs. Let's get started by viewing the brief introductory video below.
The Basics (click on Play button)
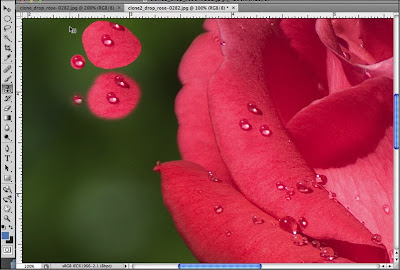
Below is the final example from this video and a summary of the topics covered:

- Selecting the Clone tool
- Hard/soft brush slider control
- Brush size control
- A simple clone example.
Typical uses for this very flexible tool include:
- duplicating picture elements within the same picture -- like the placement of the third water drop in the video above
- eliminating imperfections
- eliminating elements that distract from a photograph's composition.
The following video clip provides an example of eliminating imperfections in the informal portrait above.
Removing blemishes and imperfections (click on Play button)
Below are the enlarged "before and after" pictures from the video above:
This video exercise demonstrates the basic cloning steps required to remove common imperfections and blemishes. Points to remember include:
- Before attempting this type of retouching, enlarge the monitor image to 100% or greater.
- Use a brush size that is close to the size of the object to be removed.
- Set the brush hardness to 0% to provide a soft edge to the clone brush to allow the clone to blend smoothly into the surrounding image area.
- The cloning source should match the tone, density and color of the area immediately surrounding the imperfection.
It's easy to see why photographers who specialize in people pictures find the clone tool so useful. In the past, a specially-trained retouching artist using brush and paints would have been called on to perform these corrections manually on the original negative or final print -- costly, time consuming and requiring considerable artistic skills.
The next example video clip uses the cloning tool to eliminate unwanted elements within the picture below.
Click Play button to see video.
To successfully "clone out" an element within a picture, here are the tips given in this video:
- Enlarge the monitor image to 100% or more.
- Use as large a brush as the surrounding picture elements will allow.
- Don't clone a large area using a single source. Instead, use several sources to avoid establishing a pattern that can be detected by the viewer's eyes. Remember most patterns in nature are random.
The real secret to mastering cloning is practice. I know. I say practice often. But there is a knack to performing cloning in a manner that is truly invisible to the viewer. I'm definitely not an artist, but I'm pretty good at cloning. It's a knack that anyone can learn. It just takes practice. So, select a few of your images and force yourself to practice your cloning skills. You will eventually be amazed at what you and your mouse can do to improve your photographs.


