This post will provide the basic instructions for using layers in Photoshop taking a very simple, but very typical, project.
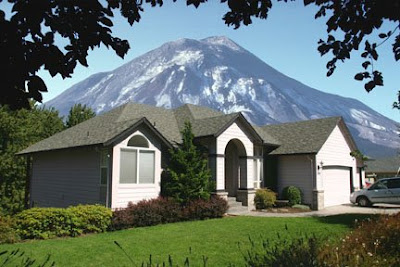
When my family moved to Vancouver, Washington a couple of years ago, we left behind our family and friends who were located in the midwest and east coast. Not long after our moving announcement, I started receiving concerns from relatives about Vancouver's close proximity to Mount St. Helens -- about 40 miles to the east. This "east of the Mississippi" concern seemed like an ideal situation for some photographic humor. The components of the image I envisioned are shown below.
My goal was to combine these two images to produce a believable image that made St. Helens appear to be in the backyard of our new home. This was definitely a job for Photoshop LAYERS feature.
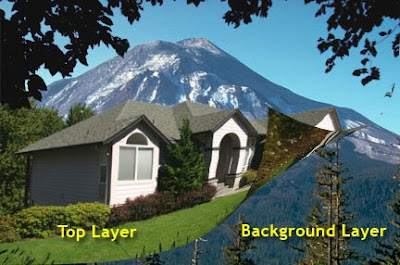
Layers can be compared to pieces of clear plastic that are layered on top of each other. Each of these layers can contain any portion of the final overall image. Walking through this project should make this concept more easily understood.
I started by opening both images in Photoshop. I first worked on the image of the house by selecting all of the parts of the original house image that I wanted to retain in the final combined image. (The various methods for selecting portions of a picture will be covered in other posts.)
The Photoshop image above shows all the selected areas shaded in red. This portion of the original image will be placed in a layer ON TOP OF the Mt. St. Helens picture.
Still looking at the original picture, the area shown in red above was NOT selected and will not be used in the combined picture. It's important to note that this red area (since it is NOT selected) will appear as CLEAR in the final image. In this case, CLEAR means that anything contained on the layer(s) behind will be seen through this "clear window".
With the house selected, I next performed a "copy" from Photoshop's Edit menu. Now I clicked on the picture of St. Helens to activate that window. Then I perform a PASTE from Photoshop's Edit menu.
Two operations will happen automatically during this PASTE command:
- A new blank layer will be created in the St. Helens picture (laying immediately on top of the Mt. St. Helens image).
- The image that I selected in the original house picture will be PASTED onto the newly created layer.

Image with the selected house picture "pasted" onto the layer above the St. Helens background image.

Here the house "layer" (top layer) is peeled back to show the hidden portions of the St. Helens image in the background layer (bottom layer).
The first picture above shows the results of pasting the house image onto the original St. Helens image. The second picture above has peeled back the top layer (house) to reveal what is hidden of the St. Helen's image. Notice: all that is seen of Mt. St. Helens is the portion of the original image that was BEHIND the CLEAR area of the house picture.
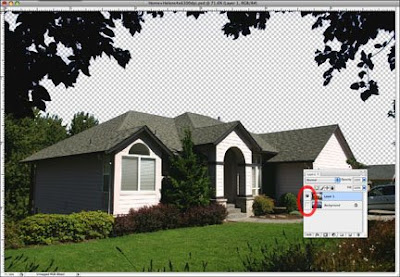
The Layer menu shown above indicates the layers of this image and their relationship to each other.
- Background layer = Mt. St. Helens
- Layer 1 (located above the background layer) = The selected portion of the original House picture.

The Background "eye" icon is clicked to OFF (red circle) to show only the house layer
It is important to understand that each of these layers are very much "independent" images. They can, and should be, considered to be two separate pictures. Any layer can be individually selected and any Photoshop tool or function applied.
In the picture above, I selected the mountain layer (background) and used the color controls to exaggerate the blue and demonstrate that each layer can be treated as separate images. This feature allows you to apply any Photoshop function to any image layer in your picture.
So with the image now complete, I only needed to add a caption (shown below), print out several copies of the picture and mail it to my nervous relatives. Needless to say, I received several phone calls from my shocked friends and family.

"Our Realtor said we would be safe."
This completes the initial "layers" primer. The project in this example required only two layers. The number of layers is, in reality, only limited by the memory inside your computer. In some editing projects, I have created 50+ layers to produce the final image and effect required by the assignment. Be aware that adding and saving layers will produce larger image files. Photoshop offers several different types of, and uses for, layers. As a result, future iDarkroom posts will have much more to say about layers. You'll find that "layers" and the endless creative possibilities this feature delivers will become one of your most appreciated iDarkroom tools.


No comments:
Post a Comment