Here's the
Image Size window in a size that's actually legible. Most of the explanations and procedures in this re-sizing article require the use of this
Image Size tool. The information initially presented in the
Image Size window provides the current technical "size" details of the image as well as entry boxes for altering any dimensions.
The
Pixel Dimensions section (red box) shows the size of the image in terms of pixels. In this case, the dimensions are of an image that came directly from the camera -- 3872 pixels wide by 2592 pixels high. The
Document Size section (green box) indicates exactly how large the image would be if printed right now. In this case the measurement scale is set in inches. So a print from this image would measure 16.133 inches by 10.8 inches with a resolution of 240 pixels per inch. (
Document Size is the measurement for the entire printable area -- not necessarily the size of the picture on the document. More on printable area in just a moment.)
My first editing task is to crop the image to include only the portion of the picture needed for the final print.
 Cropping Tool in Photoshop can be seen as the marque lines in this screen picture
Use of the cropping function will be explained in later articles, but for this example notice the cropping
marque lines (the marching ants as Adobe would say) that define where my cropping will occur. (I'm taking a little image area off each end of the picture.) With the crop area visually defined, hit ENTER. The crop is completed and appears on my monitor.
 The new Image Size information after the crop was performed.
Remember the original size of this image was 16.133 inches by 10.8 inches. The new cropped size (seen above) is 14.917 inches by 10.8 inches. This new dimension reflects the fact that I cropped (approximately) one inch off the ends of the original picture. The crop function has also caused the overall file size to become smaller. The number next to the words "Pixel Dimensions" indicates the current file size. This cropped image reduced the file size from 57.4 megabytes to 53.1. What happened to the other 4.3 megabytes of image information? It was trashed.
Next I SAVE the image under a new name to avoid corrupting my original image file.Then with a little Photoshop magic I apply the color, density, saturation, etc. adjustments needed to create a masterpiece. (These steps are not covered in this article.) When done making corrections, I again
SAVE the file.
 Cropped image with corrections applied as seen in Photoshop
That was easy. Now I need to re-size the image for its intended use. Some of the possible uses include:
- Producing a print from my printer
- Producing an image file for reproduction in a printed publication
- Producing an image file that can be used in a digital slide show or on the Internet.
Each of these possible uses has unique image size parameters. It's these parameters that determine the specifications entered into the
Image Size window.
1. Resizing the photo for printing on your home printerYou'll see much debate on photo blogs and forums about the resolution (pixels per inch or PPI) required to make a good print in your iDarkoom. The recommendations range from 200 to 300 PPI. I know from my career at a major photo printer manufacturer that my printer works best at 240 PPI. Using a pixel per inch setting higher than 300 has little or no impact on the quality of the final print. So, when I set up an image for printing at home, 240 PPI is my target resolution.
All I need to know now is what size I want to make the print. For example's sake, let's size the existing 14.917 inches by 10.8 inches x 240 PPI to fit on a standard 8"x10" piece of photo paper with at least a 1/2 inch border for framing purposes.
 Image sizing for an 8"x10" print
 More to come.
In the picture above, I have entered a new value for the width of this image -- 9 inches. The height of the image AUTOMATICALLY changed to the correct proportional value -- 6.516 inches. Why did the height change when I entered 9 inches for the width? Because I checked the box labeled
"Constrain Proportions". This instruction tells Photoshop to keep all sides in proportion to the original image. This relationship is shown in the green box above by the lines and padlock icon. Change one height/width dimension, and the remaining dimension changes automatically to
constrain the proportions.
Since I want the image to print at a resolution of 240 PPI, I do NOT want the original resolution of 240 PPI to change. I ensure this PPI is retained by CHECKING the RESAMPLE box shown in red. If I had not CHECKED this box the resolution would also have changed in proportion to the new 9" width dimension I entered. (With RESAMPLING off and since I technically made the picture smaller than the original, the PPI number would have automatically increased to reflect the smaller image size.)
If you're asking why the height dimension shown in the Document Size area is 6.516 and not 7 inches to give me a 9"x7" print on the 8"x10" piece of paper, then please read my article entitled "Proportions in Photography" on my Hub's Photography Tips blog site.Clicking on OK completes this re-sizing operation. Then
SAVE the image, and you're ready to print.
It's time to explain
"printable area" and its relationship to
Document Size. In the above example, the
Document Size is the
"printable area". Consequently, the pixel dimensions of the image and the
Document Size are exactly the same.
Document Size does NOT refer to the paper being used in the printer. It only refers to the size of the complete image that will be sent to the printer.
An example should help. Many photographers make the artistic decision to print their picture on paper larger than the image they are preparing. This layout can be accomplished in Photoshop by enlarging the entire "canvas" that the picture occupies.
 Canvas Size Window in Photoshop
A function called
Canvas Size under the
Image pull-down menu activates the window shown above. Size values can be entered in the height and width boxes to increase the size of the canvas. It's important to remember that
Canvas Size function doesn't enlarge the image. Instead it adds new canvas space AROUND the existing image.
Using the example picture, I want to print the original cropped file (14.917 inches by 10.8 inches) onto a 13"x19" piece of fine art paper. I also want to control exactly where on this large piece of paper my image will appear. To make this happen I:
- enter the new canvas width and height information into the boxes (green oval),
- instruct the computer to place my image in the center of this new canvas by clicking on the CENTER box in the Anchor selection section (blue oval), and
- select "white" as the color of my canvas using the canvas extension color menu
Notice that the size of this file has now increased to 81.4 megabytes -- due to adding the extra white canvas area to the file.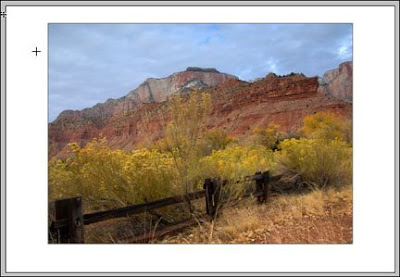
New 13"x19" Canvas
Now the monitor displays the original picture placed on a 13"x19 white canvas. The picture-only portion of the canvas was then moved upward on the canvas by one inch to give it the proper visual positioning for mounting.
One more time, open the
Image Size window and the impact of changing the canvas size is apparent in the
Document Size section.
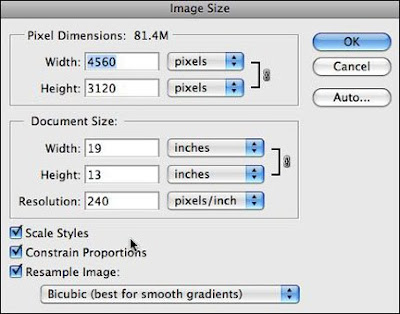 Image Size information after the canvas was enlarged
The new Document Size is 13"x19" even though we know that the image on the canvas is 14.917 inches by 10.8 inches. The entire 13"x19" canvas is the printable area and is reflected in the Document Size. In addition the Image Size window reports that the file size is now 81.4 megabytes. So, (in the Image Size window) Document Size equals the actual image size only when the Canvas Size equals the actual image size.
OK,
National Geographic Magazine has called and wants to use this picture in an upcoming issue. Happens every day. Right.
The magazine's specifications require an image with a PPI of 300. I
SAVED my initial cropped and corrected image file, and it is currently sized at 14.917 inches by 10.8 inches x 240 PPI.
All I need to do is re-size the image to
National Geographic's specifications.
 Resizing for magazine publication
Opening the "Image Size..." window, I can change the single variable -- Resolution -- in the Document Size/Resolution box (shown in green) to 300. This time, however, I UNCHECKED the RESAMPLE box (see above). Consequently all three dimensional attributes are LOCKED together and the width and height of the image AUTOMATICALLY change to remain in proportion to new 300 PPI entry. (11.933 inches by 8.64 inches) Clicking OK will complete the change. Then
SAVE the altered file under a new name.
(Impress others by including the words National Geographic in the new file name.)When the photo editor at National Geographic receives this file, it will be given final sizing as it is placed in their digital publishing program. All that's left to do is cash the check.
3. Producing an image file that can be used in a digital slide show or on the InternetAll of the images I use for Hub's photo blogs must be resized to accommodate the specifications of my visitors' monitors. This means that I must place images into my blogs that have a PPI of 72. I also limit the height and width dimensions of these images to a maximum value of 6 inches for either side. So now I have my parameters, let's convert the same picture for use on this blog site.
 Resizing for Internet or Monitor Slide Shows
The original images I produce for these blogs are always larger than the image that is ultimately placed on the blog page. To reduce the size of my images, I use the "Image Size..." tool as shown above. This example picture is horizontal (wider than it is tall). I enter "6" in the width box. Because the "Constrain Proportions" box is CHECKED, the Height dimension automatically changes to 4.344 inches. I've also CHECKED the RESAMPLE IMAGE box to allow me to enter a new PPI of 72 in the RESOLUTION box (inside the green oval).
Clicking OK completes the action and results in an image with the dimensions of 6 inches by 4.344 inches by 72 PPI. I
SAVE this file under a new name, and it's ready to upload to my blog page.
Note: The Resizing Golden Rule states that enlarging a picture beyond its original dimensions and PPI constraints is to be avoided. As has been stated in earlier articles on this blog, making this type of enlargement involves interpolating the image. To make this happen Photoshop and all image editing programs must "make up" digital data. In other words, in order to provide enough pixels to comply with your enlargement request, the software must "guess" what the missing pixels would have been. Photoshop is pretty good at guessing, but it's still just a guess.
So if you must enlarge a picture larger than its technical specification, do it sparingly and keep the enlargement as small as possible. In practical terms, if the file out of your camera is capable of making a horizontal print that's say 12"x9" without any interpolation at 240 PPI, can you enlarge the picture to 14" wide with the same 240 PPI without noticeable quality loss? The anwer is YES. Can you make a print that's 24" wide? The answer is again YES. But at this more extreme enlargement size, you will see a quality difference.
In fact, you can make this picture ANY size you want, but the more it's enlarged the more noticeable the imperfections caused by interpolation will become.As I mentioned at the beginning of this article, there are several ways to re-size pictures using today's image editing programs. The method explained here will be used for the majority of your work and is common to most imaging software.
If you have questions or comments regarding this primer on re-sizing digital image files, please let me know.