About This Digital iDarkroom Primer

This Primer on the new digital darkroom is provided on this blog to arm new DSLR photographers with the fundamental knowledge needed to become familiar with the evolving digital technologies and be able to apply them to their emerging interest in the photographic art. To read this Primer in logical order, please begin with the oldest post and read to the most current. Click HERE for Table of Contents.

Along the way, you'll find, photography tips, photography techniques and an ample dose of solid photo basics to help you feel comfortable in your digital darkroom.

A sister site, Hub's Camera, covers the fundamental mechanics of using your new DSLR camera. Then visit Hub's Photography Tips for basic but essential tips on all things photographic. Links to both of these sites can be found in the right-hand column of this page. Happy shooting!

"Hub's iDarkroom" is a non-commercial, educational service of Hubbard Camera LLC.

Thursday, November 27, 2008

Hub's iDarkroom Table of Contents

Sunday, November 16, 2008

Part 19 - Storing Digital Images

If there's a downside to your new found photographic passion, it's the fact that there's almost no limit to the number of pictures that can be taken. There's no film to buy. There are no film processing costs. And DSLR data storage cards can be used over and over to spread their cost over hundreds or thousands of pictures.

With almost no cost involved, today's DSLR photographers shoot more images than ever. Now the issue is the safe storage of files. Not only the data files from the camera's storage cards, but all the variations made from the files during post processing in image editing programs. Just one file might give birth to several more. Here's an example of the versions in the life of just one digital image:
  • The original camera file that was copied and saved to your computer's hard drive.
  • One file in the same size as the original file that has been edited, corrected and saved.
  • One file that was re-sized and saved for use on a website.
  • One file that was re-sized and saved to make an 8"x10" print for your den.
  • One file that was re-sized and saved to appear in a magazine or newspaper.
In this case, one original file generated the need to save 4 new files. Multiply this scenario for all your best images and you are soon experiencing a computer hard drive that's overflowing. Most disturbing is the vulnerability of these fragile and irreplaceable files. There are dozens of ways this data can be lost forever, like:
  • power surges
  • jarring or dropping a hard drive
  • virus attack corrupting the hard drive
  • computer being stolen
  • the hard drive wearing out over time from normal use
  • your 8-year old types "reformat"
  • alien computer abductions.
It's obvious some regular and "adhered to" back up process is necessary for image security and peace of mind. The Internet is filled with suggestions for backing up your images -- some good, some bad.

I will describe the procedure I use for backing up and storing my images. My method is not necessarily any better, but it has provided me with the confidence to know that my images are protected and always retrievable.

To start with, my primary imaging computer is an iMac. (No, that's not a recommendation, it's just the digital imaging computer I grew up with and am most comfortable using.) The current Mac OS has an automatic back up feature called Time Machine. I have a dedicated 750GB hard drive that is used by Time Machine to provide an HOURLY backup of my "changed" or new files.

I use the Time Machine feature as a secondary backup (sort of a "just in case" copy of my files). My primary back up device is a 1 terabyte Seagate external hard drive that stores an exact copy of my computer's hard drive that is created every morning at 2 a.m. using a backup program called SuperDuper. This primary back up drive is connected to my computer by Firewire (rather than USB) to provide faster copy speeds. If you have more than one computer or are part of a network, this "image-dedicated" back up drive can also be installed to allow back up over the network.


Seagate Free Agent, 1 Terabyte External Hard Drive

Here is the process I follow for uploading and protecting the files coming from my DSLR:
  1. Using Lightroom's import feature I transfer the files from my data card to a dedicated Lightroom image folder.
  2. I then make a second copy of the same files into a dedicated holding folder on my external terabyte hard drive.
  3. I then erase the original files from my data card for re-use.
  4. SuperDuper and Time Machine perform their timed back ups to ensure my original and edited images are backed up on two separate hard drives.
  5. Over time the Holding Folder on my terabyte drive grows in size. When the folder reaches 4 gigabytes, I copy the folder to a DVD for long term storage. The files in the Holding Folder are then erased in preparation for the next series of images. I am very careful to store my DVDs in a safe environment to maximize their life.
There is much dispute over the life expectancy of CDs and DVDs, but they are the best alternative available today. The better (and more expensive) DVDs do have a longer projected life expectancy. Since there's little likelihood that these DVDs will be needed on a regular basis, it's a good idea to consider storing them off-site (i.e. safety deposit box, under grandma's bed, etc.). If the worst ever happened and something catastrophic happened to your digital darkroom, your original image files would be safe.

In total, I have 4 copies of my original files and 3 copies of any new or altered versions I create from the original image files. Although my procedure isn't bullet proof, it does allow me to sleep better at night.

Not long ago, the expense of 750GB and 1 terabyte drives made this back up process financially prohibitive and other alternatives like storing images on Internet services were more attractive. However, the cost of large capacity hard drives has dropped dramatically and is within the reach of most photographers. Be sure to research and compare hard drives to determine the positives and negatives that real users are experiencing.

Finally, with the exception of Time Machine, these same procedures are adaptable to any PC platform and operating system.

Tuesday, November 11, 2008

Part 18 - Resizing Digital Images

Like an enlarger in a traditional darkroom, images can be re-sized in the digital iDarkroom to suit the requirements of the job. The computer replaces the enlarger, and a new set of tools as well as technical jargon are used to make these necessary image conversions. This article will provide the basic information required to re-size pictures to their required dimensions and resolution.

Adobe's Photoshop will be used as the editing tool, but the lessons learned here are applicable to nearly all image editing software. As you become more proficient with your own image editing software, you'll discover that there are several ways of re-sizing an image. But the most basic and most common method will be explained in this primer.


Photoshop workspace with original image, "Histogram" and "Image Size" window

The illustration above is a portion of Photoshop's workspace and shows the picture to be used in this article, the Histogram and the "Image Size" window. The picture is taken directly from the camera with no editing applied. For my purpose, this picture requires some cropping, image enhancement and resizing. It's these steps that will be walked through and discussed.

Accessing the Image Size tool in Photoshop is straightforward.


Accessing the Image Size Tool in Photoshop

To activate the Image Size tool in Photoshop, use the "Image" drop-down menu in the main bar and select "Image Size..." (shown above).


Close up of the "Image Size" window

Here's the Image Size window in a size that's actually legible. Most of the explanations and procedures in this re-sizing article require the use of this Image Size tool. The information initially presented in the Image Size window provides the current technical "size" details of the image as well as entry boxes for altering any dimensions.

The Pixel Dimensions section (red box) shows the size of the image in terms of pixels. In this case, the dimensions are of an image that came directly from the camera -- 3872 pixels wide by 2592 pixels high. The Document Size section (green box) indicates exactly how large the image would be if printed right now. In this case the measurement scale is set in inches. So a print from this image would measure 16.133 inches by 10.8 inches with a resolution of 240 pixels per inch. (Document Size is the measurement for the entire printable area -- not necessarily the size of the picture on the document. More on printable area in just a moment.)

My first editing task is to crop the image to include only the portion of the picture needed for the final print.


Cropping Tool in Photoshop can be seen as the marque lines in this screen picture

Use of the cropping function will be explained in later articles, but for this example notice the cropping marque lines (the marching ants as Adobe would say) that define where my cropping will occur. (I'm taking a little image area off each end of the picture.) With the crop area visually defined, hit ENTER. The crop is completed and appears on my monitor.


The new Image Size information after the crop was performed.

Remember the original size of this image was 16.133 inches by 10.8 inches. The new cropped size (seen above) is 14.917 inches by 10.8 inches. This new dimension reflects the fact that I cropped (approximately) one inch off the ends of the original picture. The crop function has also caused the overall file size to become smaller. The number next to the words "Pixel Dimensions" indicates the current file size. This cropped image reduced the file size from 57.4 megabytes to 53.1. What happened to the other 4.3 megabytes of image information? It was trashed.

Next I SAVE the image under a new name to avoid corrupting my original image file.

Then with a little Photoshop magic I apply the color, density, saturation, etc. adjustments needed to create a masterpiece. (These steps are not covered in this article.) When done making corrections, I again SAVE the file.


Cropped image with corrections applied as seen in Photoshop

That was easy. Now I need to re-size the image for its intended use. Some of the possible uses include:
  1. Producing a print from my printer
  2. Producing an image file for reproduction in a printed publication
  3. Producing an image file that can be used in a digital slide show or on the Internet.
Each of these possible uses has unique image size parameters. It's these parameters that determine the specifications entered into the Image Size window.

1. Resizing the photo for printing on your home printer

You'll see much debate on photo blogs and forums about the resolution (pixels per inch or PPI) required to make a good print in your iDarkoom. The recommendations range from 200 to 300 PPI. I know from my career at a major photo printer manufacturer that my printer works best at 240 PPI. Using a pixel per inch setting higher than 300 has little or no impact on the quality of the final print. So, when I set up an image for printing at home, 240 PPI is my target resolution.

All I need to know now is what size I want to make the print. For example's sake, let's size the existing 14.917 inches by 10.8 inches x 240 PPI to fit on a standard 8"x10" piece of photo paper with at least a 1/2 inch border for framing purposes.


Image sizing for an 8"x10" print

First, the Golden Rule for re-sizing operations: Reducing the physical dimensions or the resolution (PPI) of an image is OK. Enlarging any of these parameters will introduce some degree of quality and visual imperfections. More to come.

In the picture above, I have entered a new value for the width of this image -- 9 inches. The height of the image AUTOMATICALLY changed to the correct proportional value -- 6.516 inches. Why did the height change when I entered 9 inches for the width? Because I checked the box labeled "Constrain Proportions". This instruction tells Photoshop to keep all sides in proportion to the original image. This relationship is shown in the green box above by the lines and padlock icon. Change one height/width dimension, and the remaining dimension changes automatically to constrain the proportions.

Since I want the image to print at a resolution of 240 PPI, I do NOT want the original resolution of 240 PPI to change. I ensure this PPI is retained by CHECKING the RESAMPLE box shown in red. If I had not CHECKED this box the resolution would also have changed in proportion to the new 9" width dimension I entered. (With RESAMPLING off and since I technically made the picture smaller than the original, the PPI number would have automatically increased to reflect the smaller image size.)

If you're asking why the height dimension shown in the Document Size area is 6.516 and not 7 inches to give me a 9"x7" print on the 8"x10" piece of paper, then please read my article entitled "Proportions in Photography" on my Hub's Photography Tips blog site.

Clicking on OK completes this re-sizing operation. Then SAVE the image, and you're ready to print.

It's time to explain "printable area" and its relationship to Document Size. In the above example, the Document Size is the "printable area". Consequently, the pixel dimensions of the image and the Document Size are exactly the same. Document Size does NOT refer to the paper being used in the printer. It only refers to the size of the complete image that will be sent to the printer.

An example should help. Many photographers make the artistic decision to print their picture on paper larger than the image they are preparing. This layout can be accomplished in Photoshop by enlarging the entire "canvas" that the picture occupies.


Canvas Size Window in Photoshop

A function called Canvas Size under the Image pull-down menu activates the window shown above. Size values can be entered in the height and width boxes to increase the size of the canvas. It's important to remember that Canvas Size function doesn't enlarge the image. Instead it adds new canvas space AROUND the existing image.

Using the example picture, I want to print the original cropped file (14.917 inches by 10.8 inches) onto a 13"x19" piece of fine art paper. I also want to control exactly where on this large piece of paper my image will appear. To make this happen I:
  • enter the new canvas width and height information into the boxes (green oval),
  • instruct the computer to place my image in the center of this new canvas by clicking on the CENTER box in the Anchor selection section (blue oval), and
  • select "white" as the color of my canvas using the canvas extension color menu
Notice that the size of this file has now increased to 81.4 megabytes -- due to adding the extra white canvas area to the file.
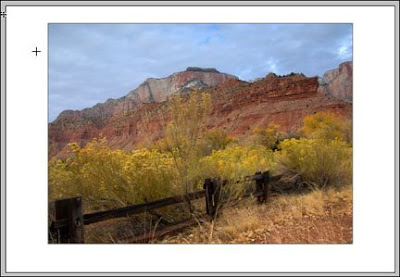

New 13"x19" Canvas

Now the monitor displays the original picture placed on a 13"x19 white canvas. The picture-only portion of the canvas was then moved upward on the canvas by one inch to give it the proper visual positioning for mounting.

One more time, open the Image Size window and the impact of changing the canvas size is apparent in the Document Size section.
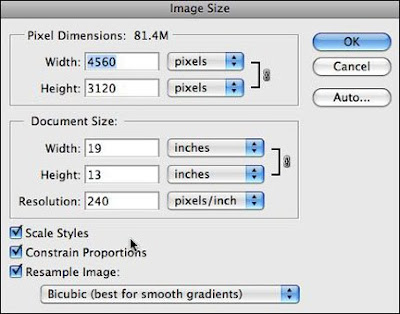

Image Size information after the canvas was enlarged

The new Document Size is 13"x19" even though we know that the image on the canvas is 14.917 inches by 10.8 inches. The entire 13"x19" canvas is the printable area and is reflected in the Document Size. In addition the Image Size window reports that the file size is now 81.4 megabytes. So, (in the Image Size window) Document Size equals the actual image size only when the Canvas Size equals the actual image size.

2. Producing an image file for reproduction in a printed publication

OK, National Geographic Magazine has called and wants to use this picture in an upcoming issue. Happens every day. Right.

The magazine's specifications require an image with a PPI of 300. I SAVED my initial cropped and corrected image file, and it is currently sized at 14.917 inches by 10.8 inches x 240 PPI.

All I need to do is re-size the image to National Geographic's specifications.


Resizing for magazine publication

Opening the "Image Size..." window, I can change the single variable -- Resolution -- in the Document Size/Resolution box (shown in green) to 300. This time, however, I UNCHECKED the RESAMPLE box (see above). Consequently all three dimensional attributes are LOCKED together and the width and height of the image AUTOMATICALLY change to remain in proportion to new 300 PPI entry. (11.933 inches by 8.64 inches) Clicking OK will complete the change. Then SAVE the altered file under a new name. (Impress others by including the words National Geographic in the new file name.)

When the photo editor at National Geographic receives this file, it will be given final sizing as it is placed in their digital publishing program. All that's left to do is cash the check.

3. Producing an image file that can be used in a digital slide show or on the Internet

All of the images I use for Hub's photo blogs must be resized to accommodate the specifications of my visitors' monitors. This means that I must place images into my blogs that have a PPI of 72. I also limit the height and width dimensions of these images to a maximum value of 6 inches for either side. So now I have my parameters, let's convert the same picture for use on this blog site.


Resizing for Internet or Monitor Slide Shows

The original images I produce for these blogs are always larger than the image that is ultimately placed on the blog page. To reduce the size of my images, I use the "Image Size..." tool as shown above. This example picture is horizontal (wider than it is tall). I enter "6" in the width box. Because the "Constrain Proportions" box is CHECKED, the Height dimension automatically changes to 4.344 inches. I've also CHECKED the RESAMPLE IMAGE box to allow me to enter a new PPI of 72 in the RESOLUTION box (inside the green oval).

Clicking OK completes the action and results in an image with the dimensions of 6 inches by 4.344 inches by 72 PPI. I SAVE this file under a new name, and it's ready to upload to my blog page.

Note: The Resizing Golden Rule states that enlarging a picture beyond its original dimensions and PPI constraints is to be avoided. As has been stated in earlier articles on this blog, making this type of enlargement involves interpolating the image. To make this happen Photoshop and all image editing programs must "make up" digital data. In other words, in order to provide enough pixels to comply with your enlargement request, the software must "guess" what the missing pixels would have been. Photoshop is pretty good at guessing, but it's still just a guess.

So if you must enlarge a picture larger than its technical specification, do it sparingly and keep the enlargement as small as possible. In practical terms, if the file out of your camera is capable of making a horizontal print that's say 12"x9" without any interpolation at 240 PPI, can you enlarge the picture to 14" wide with the same 240 PPI without noticeable quality loss? The anwer is YES. Can you make a print that's 24" wide? The answer is again YES. But at this more extreme enlargement size, you will see a quality difference. In fact, you can make this picture ANY size you want, but the more it's enlarged the more noticeable the imperfections caused by interpolation will become.

As I mentioned at the beginning of this article, there are several ways to re-size pictures using today's image editing programs. The method explained here will be used for the majority of your work and is common to most imaging software.

If you have questions or comments regarding this primer on re-sizing digital image files, please let me know.

Sunday, November 9, 2008

Part 17 - Getting Started with Layers

If there was a single feature that catapulted Photoshop to the top choice position for photographers and graphic artists, it has to be LAYERS. Today, and a decade after Photoshop first introduced layers, the feature has become a standard, must-have capability of every serious image editing program. At the same time, "Please explain layers", is one of the most frequent requests I receive at seminars and workshops from beginning photographers.

This post will provide the basic instructions for using layers in Photoshop taking a very simple, but very typical, project.

When my family moved to Vancouver, Washington a couple of years ago, we left behind our family and friends who were located in the midwest and east coast. Not long after our moving announcement, I started receiving concerns from relatives about Vancouver's close proximity to Mount St. Helens -- about 40 miles to the east. This "east of the Mississippi" concern seemed like an ideal situation for some photographic humor. The components of the image I envisioned are shown below.

Hub's Palatial Vancouver Estate -- no St. Helens in sight


Mt. St. Helens

My goal was to combine these two images to produce a believable image that made St. Helens appear to be in the backyard of our new home. This was definitely a job for Photoshop LAYERS feature.

Layers can be compared to pieces of clear plastic that are layered on top of each other. Each of these layers can contain any portion of the final overall image. Walking through this project should make this concept more easily understood.

I started by opening both images in Photoshop. I first worked on the image of the house by selecting all of the parts of the original house image that I wanted to retain in the final combined image. (The various methods for selecting portions of a picture will be covered in other posts.)


The areas shown in red have been selected for use in the composite picture

The Photoshop image above shows all the selected areas shaded in red. This portion of the original image will be placed in a layer ON TOP OF the Mt. St. Helens picture.


The area shown in red above will NOT be used in the combined image

Still looking at the original picture, the area shown in red above was NOT selected and will not be used in the combined picture. It's important to note that this red area (since it is NOT selected) will appear as CLEAR in the final image. In this case, CLEAR means that anything contained on the layer(s) behind will be seen through this "clear window".

With the house selected, I next performed a "copy" from Photoshop's Edit menu. Now I clicked on the picture of St. Helens to activate that window. Then I perform a PASTE from Photoshop's Edit menu.

Two operations will happen automatically during this PASTE command:
  • A new blank layer will be created in the St. Helens picture (laying immediately on top of the Mt. St. Helens image).
  • The image that I selected in the original house picture will be PASTED onto the newly created layer.
Shown below is the result of this PASTE operation.


Image with the selected house picture "pasted" onto the layer above the St. Helens background image.


Here the house "layer" (top layer) is peeled back to show the hidden portions of the St. Helens image in the background layer (bottom layer).

The first picture above shows the results of pasting the house image onto the original St. Helens image. The second picture above has peeled back the top layer (house) to reveal what is hidden of the St. Helen's image. Notice: all that is seen of Mt. St. Helens is the portion of the original image that was BEHIND the CLEAR area of the house picture.


The "Layer" menu window for this completed project

The Layer menu shown above indicates the layers of this image and their relationship to each other.
  • Background layer = Mt. St. Helens
  • Layer 1 (located above the background layer) = The selected portion of the original House picture.
Notice each layer is displaying an "eye" icon (inside red circle). Clicking the "eye" icons turns that layer on-and-off to allow the user to check the contents of each layer.


The Background "eye" icon is clicked to OFF (red circle) to show only the house layer

It is important to understand that each of these layers are very much "independent" images. They can, and should be, considered to be two separate pictures. Any layer can be individually selected and any Photoshop tool or function applied.


Mountain layer selected and Blue added

In the picture above, I selected the mountain layer (background) and used the color controls to exaggerate the blue and demonstrate that each layer can be treated as separate images. This feature allows you to apply any Photoshop function to any image layer in your picture.

So with the image now complete, I only needed to add a caption (shown below), print out several copies of the picture and mail it to my nervous relatives. Needless to say, I received several phone calls from my shocked friends and family.


"Our Realtor said we would be safe."


This completes the initial "layers" primer.
The project in this example required only two layers. The number of layers is, in reality, only limited by the memory inside your computer. In some editing projects, I have created 50+ layers to produce the final image and effect required by the assignment. Be aware that adding and saving layers will produce larger image files. Photoshop offers several different types of, and uses for, layers. As a result, future iDarkroom posts will have much more to say about layers. You'll find that "layers" and the endless creative possibilities this feature delivers will become one of your most appreciated iDarkroom tools.

Monday, November 3, 2008

Part 16 - Photoshop, Lightroom or Aperture

The last two posts covered the topic of organizing digital image files. The capabilities and search flexibility of programs like Adobe's Lightroom and Apple's Aperture have brought a new level of image organization and retrieval to the individual photographer that was previously the exclusive territory of sophisticated corporate image storage systems.

What's currently muddying the waters are the enhanced editing features that these organizing programs are bringing to the market. The question now being asked is: "Do I need a dedicated photo editing program, like Photoshop, or are the editing features now included in Lightroom and Aperture enough for my needs?"

This post will lay the basic groundwork towards making that distinction apparent, and ultimately help in making your "buy - no buy" decision. The best place to start is to understand the editing features these new programs offer. I will use Adobe's Lightroom for my examples, but similar features and tools can be found in Apple's Aperture. (These editing tools will be briefly described in this post. How and when to use each of these editing tools will not be covered in this primer.)


Main Lightroom Workspace

Shown above is Lightroom's primary workspace. The various modes of Lightroom are located at the top of the screen as Library, Develop, Slideshow, Print and Web. The previous two discussions took place in Library Mode (yellow box). This mode contains the organizational features of this program including keywording, metadata, image ranking, film strip, preview area and the image search function.

But even in this Library Mode some limited image status and editing operations are available. So, as an image is selected (click on image in central preview area or on an image in the film strip at bottom), an image histogram is displayed (shown in yellow) and several coarse editing functions become active (shown in green box). The histogram in Lightroom displays the levels for all the primary colors (red, green and blue) as well as the secondary colors (cyan, magenta and yellow) for a more detailed look at the digital make up of the selected image.


Quick Develop Function in Library Mode

Here are the controls available for coarse image corrections in Library Mode. These controls are not nearly as elaborate as their sister function in the Develop Mode, but they do provide a quick way of making initial adjustments to individual or groups of selected images. For example, if a particular group of your images have a slight green cast, all of the images can be selected at once and their white balances adjusted to add more magenta (magenta is the opposite of green) and reduce the green cast. In the same way, a group of images that are too dark can be lightened as a group using the coarse exposure control.

To make more critical corrections, Lightroom users select the Develop Mode in the top bar of the main workspace.


Lightroom's Develop Mode Workspace

Although the above picture is small, it does help orientate you to the Develop Mode workspace in Adobe's Lightroom. Here a picture was selected in the Library Mode to be adjusted. "Develop" (see green box) was selected from the top bar to reveal this image editing workspace.


Lightroom's Histogram and Treatment Tools in Develop Mode

That's better. In this close up view of the right-hand side of the Develop Mode workspace, the first of Lightroom's editing tools can be seen. Again a histogram is always visible and will reflect -- in real time -- any changes you make during image editing. Among the tools available are:
  • White balance control (color temperature and tint)
  • Recovery, fill light and blacks
  • Brightness and contrast
  • Presence (controlling overall clarity, vibrancy and saturation).
All of these tools are represented as sliders to allow precise control of the adjustment. Any adjustment made using these tools is immediately reflected in the large preview image in the center of the screen.


Tone Curve, Hue, Saturation, Luminance, Color and Grayscale control panels

The editing tool bar on the right of the screen has its own vertical slider to provide access to more editing options. Here the Tone Curve is shown as well as the slider controls for Hue, Saturation, Luminance, Color and Grayscale. Again each slider control allows for very precise control and any adjustments are previewed immediately on the large center-screen image. A helpful feature is available on several controls that makes visual adjustment much easier. In the above example, Saturation is shown to be active. Notice the small circle to the left-hand side of the word Saturation. Clicking on this button converts your pointer/cursor to an on-screen saturation tool.


Cursor Saturation Tool Example

Here's the cursor saturation tool (within the green circle) as it appears on the large preview image. I can now be very specific about the color that I'm adjusting. In this case, the cursor is located on top of a yellow portion of the sunset. With a combination of click/hold, I can drag the cursor up or down to increase or decrease the saturation of the yellow in the entire picture. While performing this operation, the sliders in the Saturation portion of the tool bar will move to reflect precisely the change being made. Pretty cool. This feature is available with several of Lightroom's image editing tools.


Detail and Lens Correction Options

The final two editing controls in the right hand options bar are "Detail" (for precisely controlling image sharpness) and "Lens Correction" (to adjust for or simulate imperfections common to lenses). The sharpening functions of Lightroom are very precise and flexible. See the Sharpening post in Part 13 of this iDarkroom primer for more information.


Cropping, Red Eye and Straightening Controls

Immediately below the large central preview image are the controls for setting the preview image (i.e. full screen, side-by-side before and after view, etc.). In addition, a Red Eye function is available as well as all cropping and straightening functions. Cropping and straightening are very intuitive within Lightroom and performed in real time with guidelines on the large preview image.


Lightroom's Pallet of Preset Effects

The final feature to be mentioned in this primer are Presets. Adobe has included a selection of predefined effects that can be applied to any image (shown above). The presets in Develop Mode are listed on the left-hand menu next to the large central preview image. As the user passes the cursor over each optional preset a small preview image is displayed (red box above) to provide visual feedback on the effect each preset will have on the selected image. In the example above, the preset labeled "General - Grayscale" is selected and all of the Lightroom corrections required to convert the selected image to a grayscale (B&W) image are applied. The result is immediately shown in the center-screen image.

Lightroom as well as Apple's Aperture - not covered here - also have significant additional features that make them a nearly universal imaging product:
  • Slideshow production including music and multiple export options
  • Web gallery production including a broad selection of gallery styles
  • Extensive Printing Options offering unique printing formats for numerous purposes including contact sheets and fine art layouts.
The distinctive feature unique to Lightroom and Aperture is contained in how all the corrections made during editing are applied to your original digital file.

They aren't!

In photo-speak, all of the actions (regardless of how dramatic or extensive) that you make during image editing are NOT applied directly to the original image. This is called non-destructive editing. Although you see the changes being made on-screen -- before your very eyes -- all corrections made are held by these programs as a set of instructions that are applied when the image is subsequently viewed, edited, exported as a new image file, viewed as a slide show, or printed. The original file is NEVER altered. The corrections are contained in a small text file that becomes permanently associated with each image file in your collection. (Consider this information as "image editing" metadata.)

Unlike the standard procedure of saving an original file, making corrections and then saving the new edited image under a new file name to preserve the original, Lightroom and Aperture save all that hard drive space and file organization chaos by maintaining a very small text file that allows these programs to apply the corrections within the program each time the image is accessed.

Then which type of program should a photographer choose -- a dedicated image editing program like Photoshop or an all-in-one software package like Lightroom or Aperture? Much of the answer is determined by the photographer and the images he/she wants (or is required) to produce. Although it's highly likely that a professional photographer's computer will have both types of programs, it is also becoming more and more frequent for these photographers to do the majority of their work in Lightroom or Aperture.

Why is this?

Most working professionals -- especially commercial and studio photographers as well as photojournalists -- have become extremely proficient at capturing a technically and compositionally accurate image in the environments they typically encounter. Their need for extensive image editing is minimal. However, their need for organizing and editing speed as well as the ability to meet tight deadlines is extremely high. So a typical workflow (under "normal" conditions) for these pros might be something like:
  • Download all images from camera's storage card and generic metadata into Lightroom or Aperture
  • Review all images and determine images to be used for the assignments (selects)
  • Apply image-specific metadata to selected images
  • Perform any corrections that can be applied to all images
  • Perform any corrections necessary to specific images
  • Export images in required format (with Lightroom corrections applied)
  • Transmit images to their editor or client.
Remember this is only an example. Each photographer has his/her own personal workflow. But they will generally include similar steps. For these pros or any skilful photographer, Lightroom or Aperture is capable of performing all the steps in their workflow. So, many photographers have drifted to using Lightroom or Aperture the majority of the time.

However, other photographers in the industry or in the non-professional ranks -- including fine art photographers, architectural photographers, photographers shooting for illustrations or advertising, etc. -- have a critical need of performing fine adjustments throughout the entire image. As a result, stand-alone imaging programs like Photoshop are a necessity in their work.

The strength of dedicated image editing programs like Photoshop is found in the almost limitless image control they provide to their users. Unlike Lightroom or Aperture where the corrections made are almost always to the entire image, Photoshop-like programs allow control over the individual components of a digital image -- down to the individual pixel level. Layers can be applied. Actions can be utilized. Cloning can be achieved. Delicate masking can be accomplished. HDR and panoramas can be accommodated. Paths can be constructed. Text can be introduced. These are some of the options not currently available in Lightroom or Aperture that are considered essentials to the work of many photographers.

In the end, the photographer must choose based on his/her image editing requirements. Because of the different strengths of each type of program, both are likely to be found in a photographer's iDarkroom.

It will certainly be interesting to watch the evolution of Lightroom and Aperture as Adobe and Apple continue to add more and more dedicated image editing program features. Who knows, we may be heading towards an all-in-one software solution.

Which would I recommend?

That's tough. But if I were just starting out -- and understanding the importance I place on keeping digital images organized and accessible -- I would probably buy either Lightroom or Aperture first. Putting organization considerations aside, the editing features of Lightroom and Aperture are extensive and certainly powerful enough for newcomers.

I would learn the ins and outs of these programs including all the image editing tools and functions. Then when I had conquered the tools and as my finances allowed, I would purchase a dedicated image editing program like Photoshop to cover the full range of my editing needs. Virtually everything I learned while using Lightroom or Aperture would transfer to shorten the learning time associated with most dedicated image editing programs.