About This Digital iDarkroom Primer

This Primer on the new digital darkroom is provided on this blog to arm new DSLR photographers with the fundamental knowledge needed to become familiar with the evolving digital technologies and be able to apply them to their emerging interest in the photographic art. To read this Primer in logical order, please begin with the oldest post and read to the most current. Click HERE for Table of Contents.

Along the way, you'll find, photography tips, photography techniques and an ample dose of solid photo basics to help you feel comfortable in your digital darkroom.

A sister site, Hub's Camera, covers the fundamental mechanics of using your new DSLR camera. Then visit Hub's Photography Tips for basic but essential tips on all things photographic. Links to both of these sites can be found in the right-hand column of this page. Happy shooting!

"Hub's iDarkroom" is a non-commercial, educational service of Hubbard Camera LLC.
Showing posts with label inkjet printer. Show all posts

Sunday, September 21, 2008

Part 12 - From Pixels to Print

We know what pixels are. We also know that the camera doesn't produce a picture but instead a data file that describes the specific amounts of the primary colors (red, green and blue) for every pixel that comprises the picture.

So, if we really don't have a picture, how is the picture displayed on our computer monitor and then as an image from our inkjet printers? Key to understanding these technological miracles is remembering that there are two ways of reproducing the visible spectrum:
  • By using the three additive colors (also called primary) -- red, green and blue -- in nearly infinite density combinations to replicate all visible colors
  • By using the three subtractive colors (also called secondary) -- cyan, magenta, yellow -- in finite density combination to reproduce all visible colors.
The iDarkroom uses both methods:
  • The computer monitor displays images using the Primary Colors -- red, green and blue.
  • The inkjet printer produces images using the Secondary Colors -- cyan, magenta and yellow (and adds a black ink to provide contrast and a truer black than can be produced by man made cyan, magenta and yellow inks together).
Click here to review my earlier post Color Primer for more details.

The following graphic borrowed from Wikipedia is the best illustration I have found to help understand monitor vs. printer methods of creating an image as well as the relationship between pixel's per inch (PPI) and dots per inch (DPI):


Each grid represents a 10 by 10 pixel area of a much larger multi-million pixel image

Starting with the monitor

The data contained in the original image file is saved in terms of red, green and blue per pixel (a value between 0 and 255 for each primary color). As shown above, a typical sRGB computer monitor is capable of displaying all 256 values of red, green and blue at each pixel location. At 256 x 256 x 256, this means each pixel can display all 16.7 million colors that a typical DSLR's image sensor is capable of recording.

This display approach is straightforward. The only additional math or adjusting of the monitor that must be done (via the ICC profiles used by your image editing program) is to take into account the color space of the original image file. If you've set your camera, for example, to use the Adobe RGB color space, the computer will adjust the pixel color values to present the correct Adobe RGB colors on the RGB monitor.

Moving on to the inkjet printer

The "original image file" to "inkjet print" relationship is more complex for several reasons:
  • Inkjet printers use the secondary colors to reproduce the visible color spectrum -- cyan, magenta and yellow. So, RGB values contained in the original file must be converted to secondary colors as well as to the color space of the printer/paper combination.
  • Inkjet printers place "dots" of color on paper, but these dots are limited to the color cartridges in your printer. In today's photo inkjet printers, this typically means 8 different colors. For example black, photo black, matte black, cyan, light cyan, magenta, light magenta, and yellow are used by many entry level photo printers.
  • Printer resolution is expressed in terms of the number of "dots" it can place within one inch. Dots-Per-Inch (DPI).
  • Inkjet "dots" of ink are necessarily much smaller than a pixel. (Explaining why printer DPI numbers are so much larger than the PPI of the image file.) This is critical since the "dots" of ink can only be one color and one density. In order to provide the illusion of continuous tone, tiny dots of ink are placed in extremely close proximity to each other to provide the subtle shades of color required in a photograph.
In fact, the dots placed on paper by an inkjet printer are so small and so close together that our eye cannot distinguish the individual dots and colors without considerable magnification. Our brain visually blends these areas to produce a shade of color. (Much the same way modern military camouflage blends and marries into the surrounding natural colors to become part of the background.) The right hand portion of the illustration above reveals that only secondary ink dots are present and that there are many, many "dots" of secondary color in each pixel area. The higher the DPI, the more dots a printer can produce per inch and the more detailed and continuous the printed image appears.

Once again, the multiple variables involved in the process of creating a print -- camera, to monitor, to final print -- are apparent. And, once again, it's obvious with all the necessary conversions and adjustments taking place behind the scenes that -- even if we make NO image adjustment of our own -- unless the entire workflow is calibrated and in control, the odds of any picture being an accurate reflection of the original scene are slim.

But knowing what's happening throughout the workflow and taking the necessary steps to calibrate your iDarkroom are the first steps to stunning prints.

If you have any questions or comments, feel free to pass them along.

Tuesday, September 9, 2008

Part 8 - Inkjet Printers - Dye vs. Pigment Ink


Just when you think it's safe to go to your photo store and speak "printer-ese", another term and another decision shakes your confidence. Do I buy a printer that uses "dye-based" inks or "pigment-based" inks?

The choice you make does have a significant impact on your image making. Like everything else in photography, there are trade-offs to consider. This post is intended to explain the basic differences between these two ink types and make it easier for you to make your printer purchase.

Background

Dye-based inks have been around in the inkjet printer marketplace since the beginning. The dyes used to produce this ink are derived from vegetable matter that contains the desired color, or they are produced synthetically in the lab. Just as Indians would produce paints from the extracts of plants to add color to fabric, so do modern color scientists develop dyes used to manufacture their inkjet inks.

Dye ink has a clear cut set of advantages:
  • The size of the color particle is very small and easily dissolved in solution.
  • The particle size is small enough to penetrate any printing paper.
  • The colors are generally numerous, bright and colorful to provide a broad color range.
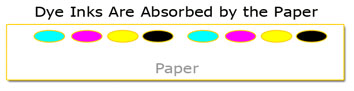
  • Because these dyes are absorbed into the printing paper, they provide excellent glossy prints.


Dye inks also have a list of photographic disadvantages:
  • Prints made with dye inks have a shorter life expectancy.
  • Bleeding is a concern (bleeding occurs as a drop of dye ink falls on a piece of paper and begins to expand in size or spread out as the drop is absorbed into the paper).
  • Dye inks are NOT water resistant (much like watercolors in the painting world).

But for many years, dye inks have been the industry standard and have been a major contributor in raising digital photography to an art form.

Pigment inks have been a serious alternative to dye inks for nearly a decade now. Unlike dye inks, pigment inks are derived from ground up minerals. The resulting sizes of the pigment particles are 50 to 250 times larger than dye particles. Although relatively new to the inkjet scene, pigment inks/paints have been used for centuries in the world of art.

As you probably have guessed, there is a list of advantages that pigment inks bring to the photographic table:
  • Pigment inks are very stable and resistant to fading.
  • Pigment ink's resistance to water and moisture is superior.
  • Pigment inks can also produce exceptional black and white prints.

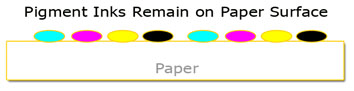
Unlike dye inks, pigment inks are NOT absorbed into the paper. Pigment droplets remain on the paper's surface:


The most significant disadvantages of pigment inks are:
  • The large pigment particle size is hard to maintain in solution (pigments want to settle out of solution).
  • Because the pigment droplets remain on the surface of the paper, it is hard to produce a high-gloss print and the effect known as metamerism is visible on these papers. (Metamerism will be covered in a future post.)
  • Although rapidly improving, the color gamut of pigment inks is smaller than dye inks.

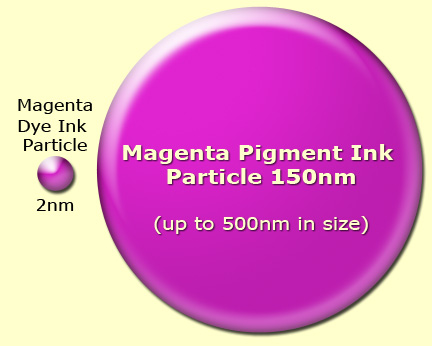
The problem with maintaining these particles in solution is best seen when you compare the relative sizes of dye and pigment particles:


The dye ink particle on the left is small enough (averaging about 2 nanometers in size) to dissolve in the ink's carrier solution (and remain in solution) while the larger pigment particle is difficult to hold in suspension and tends to settle and clump together. It's this clumping and settling that produces the clogging of nozzles that's so frequently discussed on blogs and forums. The big three printer manufacturers, Epson, HP and Canon, have all worked diligently on producing ways of reducing this clumping and clogging tendency on their printers by encapsulating the pigment particles.

Today the situation is much improved. Although head clogging hasn't been eliminated, by carefully following the manufacturer's maintenance suggestions this problem and the associated expense of cleaning (or replacing) printheads can be greatly reduced. As a general "Hub" rule: Pigment printers work most consistently with minimal maintenance issues when used regularly. Working the printer helps keep the pigments in suspension and greatly reduces the probability of excessive settling/clumping.

So, which is best?


There is no single answer for this question. The answer is best found in your requirements. If a large color gamut or high-gloss prints are your primary objectives, then dye inks are an excellent choice.

If long life, permanence and water/humidity resistance are your biggest concerns, then pigment inks are the clear winner. Pigment prints (kept in a photographically safe environment) will have a life expectancy of 4 or 5 times that of dye prints. Current testing done by the Wilhelm Imaging Research organization shows some pigment inks have a 250+ year archival life. To learn more about the specific life expectancy results for any printer you might be considering, check out the test results on the Wilhelm website. It's this long life characteristic that drives many fine art and professional photographers to select pigment ink printers for the prints they sell to make a living.

Note: There's much debate over the validity of print life expectancy testing. Since these tests must be conducted in a lab using accelerated testing methods, some experts dispute the results. However, there is some historic precedence for concluding that prints produced using pigment inks will enjoy an extremely long life. After all, the works of Rembrandt and Leonardo da Vinci were made using pigment-based paints, and they seem to be doing just fine.

Epson, Hewlett Packard and Canon offer dye-based and pigment-based photo printers. Most camera stores will even make sample prints from your digital files to compare results. In this way, you can see the results of dye and pigment inks as well as the capability of different printers. Of course, ask other photographers for their opinion. (We all have opinions on this subject.) Personally, I use three different printers in my iDarkroom. They are all pigment printers.

There is no debate among photographers that ink and paper cost too much. As a life long photographer, I don't see these costs as much more than I experienced with my own traditional "wet" darkroom. (To provide the best images for my customers, I consistently used the best chemistry and paper on the market.) It's part of the cost of doing business.

There are also several manufacturers making their own versions of the manufacturers' original inks for considerably less. Some even sell their inks in bulk ink systems to save the user even more per milliliter. I have seen many tests that indicate these inks do not exhibit the life expectancy or color gamut of the original manufacturers' inks. (I'll probably get lots of email about this.) However, the choice is personal. Only you can decide if any of these 3rd party products are the right choice for your quality needs and financial situation.

For the moment, decide if dye or pigment inks work best for you. And begin your own printer research. If you haven't already guessed, you cannot buy a single printer that uses both dye and pigment inks. It's an "either or" situation. Once you've decided the type of ink you want to use, you will automatically be limited to a line of printers (from each manufacturer) that can accept the ink you've selected. So any printer decision begins with making an ink selection.


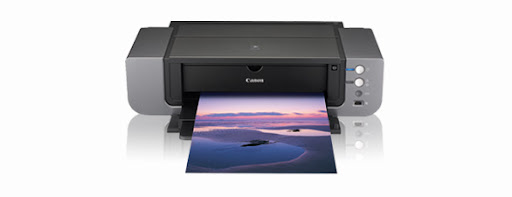
Current Epson 2880, HP B9180 and Canon Pro9500 are today's contenders for "top of the printer pack" in the 13"x19" pigment printer class.

Hope this discussion gives you the basic information needed to select your next printer. If you have any questions or comments, you know where to find me.

Powered by ScribeFire.

Thursday, September 4, 2008

Part 7 - Inkjet Printer Color Primer


At this point, you should understand the variables involved in calibrating the workflow to provide a dependable, color-managed environment. We do this homework and technical preparation to accomplish one thing -- make a print.

As a result, it seems reasonable that before rushing out to buy a printer, we need to understand the photo printer technology that's on the market today. This will be the topic of the next series of iDarkroom posts.

There is a significant difference between the typical inkjet printer used in offices to make copies, send faxes and print emails and the printers which serious amateur and professional photographers choose to make the final print that the world will see.

For all practical purposes, the home iDarkroom enthusiast will select an inkjet printer. Printer manufacturers (for the most part) have focused on inkjet printing as the technology most appropriate to serious photographic printing. This technology has exploded over the past decade to provide printers capable of producing images that rival, and in some cases exceed, the results obtained using traditional photo processing.

All inkjet printers work on the same basic principles. Minute dots of ink are placed in extremely close proximity to each other. In the most basic color inkjet printers, these dots are either cyan, magenta, yellow or black. In more advanced printers, additional colors of ink are incorporated to improve the overall color gamut of the printer (always trying to enlarge the gamut to come closer to the gamut of the camera). Colors of ink most typically added to inkjet printers are light cyan, light magenta, shades of gray, and occasionally a red, green and/or blue.

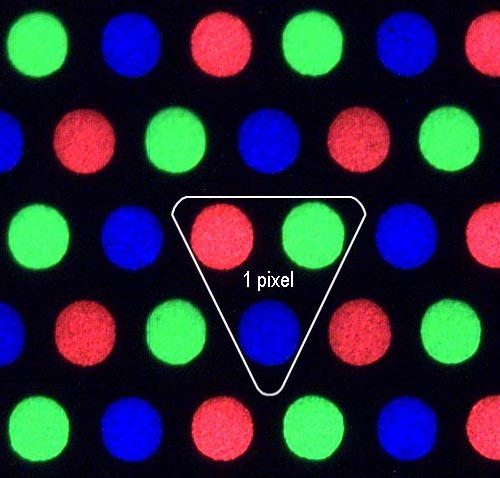
You see the magic and the technology at work when you look at a TV or monitor through a simple magnifying glass. The monitor (close up) is made up of millions of colored elements. In the case of the TV or monitor, these elements are either red, green or blue (the real primary colors). A photographic pixel is represented by one each red, green and blue element. For each frame of the image you see on TV, the elements that represent the colors in the scene are switched on. Depending on how many elements of a single color are turned on in a specific area, and which elements are turned on in the surrounding area of the scene, determines the detail and the color perceived.


Close up of red, green and blue elements in a white area of a scene.
(from Accurate Image Manipulation by Timo Autiokari)

Because the elements are far too small for our eyes to detect individually, we perceive masses of elements. This mass (depending on which pixels are turned on) is seen as a particular shade of color. Look at the simplest example first. If only the red pixels were turned on, we would see the color red over the entire screen, of course. The same is true for green and blue. But what if all of the red elements and all of the blue elements were turned on? What color would we see on the screen? The answer is magenta (a purple-pinkish color). The same example but with only red and green elements would yield the color yellow, while 50% green and 50% blue elements would be perceived as the color cyan (sort of a turquoise color). If all elements are turned on (red, green and blue), what color would you see? If all the pixels are turned off, what color would you see? Right, black (or no color). With millions of pixels on your TV and monitor, it's possible to create virtually every color under the rainbow by selectively mixing the pixels that are "on" and "off" in relation to their neighboring pixels.

Printers work in exactly the same fashion. But instead of using the primary colors (red, green, and blue), printers use the secondary colored inks (cyan, magenta and yellow). So, what about the black cartridge in my printer? Well, in theory, the combining of cyan, magenta and yellow ink produces the color black. However, in the real world of ink and paper, combining the secondaries in equal proportions produces "mud" (a dirty dark brown). So, a black ink cartridge is added to the mix to produce a true black on paper. Second trick question. If combining cyan, magenta and yellow produces (in theory) the color black, how is the color white produced on an inkjet printer?

The answer is: It isn't.

The paper is white. So, the absence of any cyan, magenta, or yellow ink means no ink is placed on the paper, and we see that lack of ink as the white of the paper. Naturally. This is true for traditional photo processing as well. Anytime white appears in a picture, it's actually the base (white paper) that's being seen.


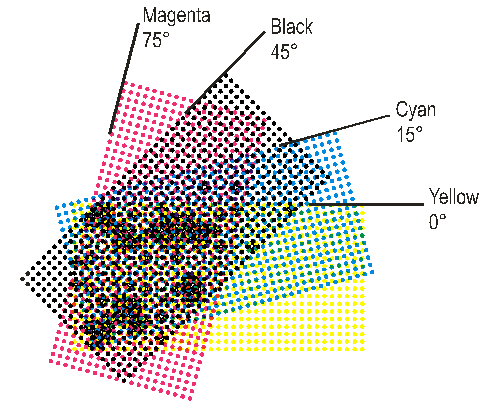
This graphic shows the cyan, magenta, yellow and black dots that create the image and colors in an inkjet print. Notice the colors overlap to produce their primary cousins (red, green and blue).


Color Imaging Math

Using the Primary Color Pallet (Red, Green and Blue)
Often referred to as RGB or Additive Color. Remember Adobe RGB?

  • Red+Blue = Magenta
  • Red+Green = Yellow
  • Green+Blue = Cyan
  • Red+Blue+Green = White

Using the Secondary Colors (Cyan, Magenta, Yellow)
Often referred to a CMYK or Subtractive printing (K stands for the extra black ink that's included in the printing system)

  • Cyan+Magenta = Blue
  • Cyan+Yellow = Green
  • Yellow+Magenta = Red
  • Cyan+Magenta+Yellow = Black

By using all the colors of the primary OR secondary color pallets in VARYING amounts all colors can be reproduced.


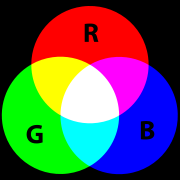
Here's the color wheel that photographers and photofinishers have used for centuries. From this graphic, the relationship of the primaries or additives can be seen where the red, green and blue circles overlap to produce the secondary colors -- cyan, magenta, yellow -- and finally white where all three colors intersect.


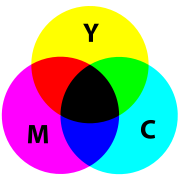
This is the color wheel that traditional press printers (i.e. commercial offset presses and inkjet printers) use to explain the relationship of the secondary or subtractive colors -- cyan, magenta, yellow. These colors overlap to produce the red, green and blue primaries as well as the color black where they all intersect.

As with other topics discussed in this series of posts for the beginning iDarkroom enthusiast, there is much more to the subject of color reproduction. But a solid understanding of these fundamental concepts will serve you well for making your first quality inkjet prints.

The next post will continue the inkjet printer discussion with the basics of Dye and Pigment inks. The decision as to whether you will use Dye inks or Pigment inks plays a major role in your printer purchase.

I hope this first basic inkjet printing post has been easy to follow. If you have any questions or comments, you know where to find me.

Powered by ScribeFire.