
At this point, you should understand the variables involved in calibrating the workflow to provide a dependable, color-managed environment. We do this homework and technical preparation to accomplish one thing -- make a print.
As a result, it seems reasonable that before rushing out to buy a printer, we need to understand the photo printer technology that's on the market today. This will be the topic of the next series of iDarkroom posts.
There is a significant difference between the typical inkjet printer used in offices to make copies, send faxes and print emails and the printers which serious amateur and professional photographers choose to make the final print that the world will see.
For all practical purposes, the home iDarkroom enthusiast will select an inkjet printer. Printer manufacturers (for the most part) have focused on inkjet printing as the technology most appropriate to serious photographic printing. This technology has exploded over the past decade to provide printers capable of producing images that rival, and in some cases exceed, the results obtained using traditional photo processing.
All inkjet printers work on the same basic principles. Minute dots of ink are placed in extremely close proximity to each other. In the most basic color inkjet printers, these dots are either cyan, magenta, yellow or black. In more advanced printers, additional colors of ink are incorporated to improve the overall color gamut of the printer (always trying to enlarge the gamut to come closer to the gamut of the camera). Colors of ink most typically added to inkjet printers are light cyan, light magenta, shades of gray, and occasionally a red, green and/or blue.
You see the magic and the technology at work when you look at a TV or monitor through a simple magnifying glass. The monitor (close up) is made up of millions of colored elements. In the case of the TV or monitor, these elements are either red, green or blue (the real primary colors). A photographic pixel is represented by one each red, green and blue element. For each frame of the image you see on TV, the elements that represent the colors in the scene are switched on. Depending on how many elements of a single color are turned on in a specific area, and which elements are turned on in the surrounding area of the scene, determines the detail and the color perceived.
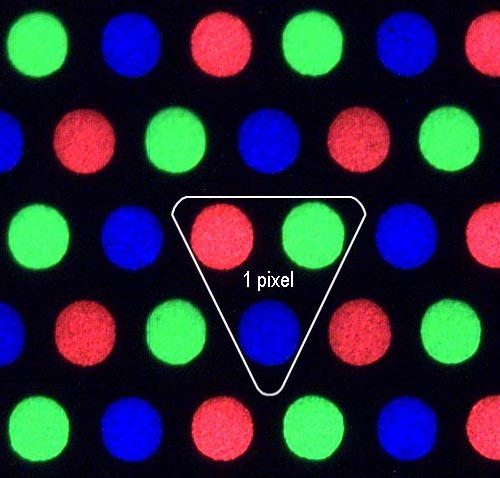
Close up of red, green and blue elements in a white area of a scene.
(from Accurate Image Manipulation by Timo Autiokari)
Because the elements are far too small for our eyes to detect individually, we perceive masses of elements. This mass (depending on which pixels are turned on) is seen as a particular shade of color. Look at the simplest example first. If only the red pixels were turned on, we would see the color red over the entire screen, of course. The same is true for green and blue. But what if all of the red elements and all of the blue elements were turned on? What color would we see on the screen? The answer is magenta (a purple-pinkish color). The same example but with only red and green elements would yield the color yellow, while 50% green and 50% blue elements would be perceived as the color cyan (sort of a turquoise color). If all elements are turned on (red, green and blue), what color would you see? If all the pixels are turned off, what color would you see? Right, black (or no color). With millions of pixels on your TV and monitor, it's possible to create virtually every color under the rainbow by selectively mixing the pixels that are "on" and "off" in relation to their neighboring pixels.
Printers work in exactly the same fashion. But instead of using the primary colors (red, green, and blue), printers use the secondary colored inks (cyan, magenta and yellow). So, what about the black cartridge in my printer? Well, in theory, the combining of cyan, magenta and yellow ink produces the color black. However, in the real world of ink and paper, combining the secondaries in equal proportions produces "mud" (a dirty dark brown). So, a black ink cartridge is added to the mix to produce a true black on paper. Second trick question. If combining cyan, magenta and yellow produces (in theory) the color black, how is the color white produced on an inkjet printer?
The answer is: It isn't.
The paper is white. So, the absence of any cyan, magenta, or yellow ink means no ink is placed on the paper, and we see that lack of ink as the white of the paper. Naturally. This is true for traditional photo processing as well. Anytime white appears in a picture, it's actually the base (white paper) that's being seen.
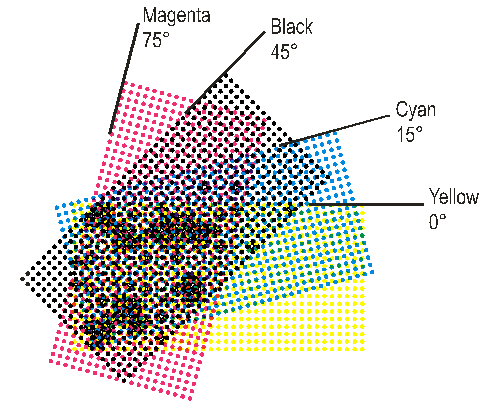
This graphic shows the cyan, magenta, yellow and black dots that create the image and colors in an inkjet print. Notice the colors overlap to produce their primary cousins (red, green and blue).
Color Imaging Math
Using the Primary Color Pallet (Red, Green and Blue)
Often referred to as RGB or Additive Color. Remember Adobe RGB?
Often referred to as RGB or Additive Color. Remember Adobe RGB?
- Red+Blue = Magenta
- Red+Green = Yellow
- Green+Blue = Cyan
- Red+Blue+Green = White
Using the Secondary Colors (Cyan, Magenta, Yellow)
Often referred to a CMYK or Subtractive printing (K stands for the extra black ink that's included in the printing system)
Often referred to a CMYK or Subtractive printing (K stands for the extra black ink that's included in the printing system)
- Cyan+Magenta = Blue
- Cyan+Yellow = Green
- Yellow+Magenta = Red
- Cyan+Magenta+Yellow = Black
By using all the colors of the primary OR secondary color pallets in VARYING amounts all colors can be reproduced.
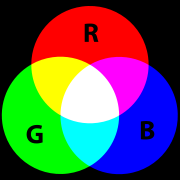
Here's the color wheel that photographers and photofinishers have used for centuries. From this graphic, the relationship of the primaries or additives can be seen where the red, green and blue circles overlap to produce the secondary colors -- cyan, magenta, yellow -- and finally white where all three colors intersect.
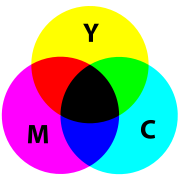
This is the color wheel that traditional press printers (i.e. commercial offset presses and inkjet printers) use to explain the relationship of the secondary or subtractive colors -- cyan, magenta, yellow. These colors overlap to produce the red, green and blue primaries as well as the color black where they all intersect.
As with other topics discussed in this series of posts for the beginning iDarkroom enthusiast, there is much more to the subject of color reproduction. But a solid understanding of these fundamental concepts will serve you well for making your first quality inkjet prints.
The next post will continue the inkjet printer discussion with the basics of Dye and Pigment inks. The decision as to whether you will use Dye inks or Pigment inks plays a major role in your printer purchase.
I hope this first basic inkjet printing post has been easy to follow. If you have any questions or comments, you know where to find me.
Powered by ScribeFire.


No comments:
Post a Comment