What's currently muddying the waters are the enhanced editing features that these organizing programs are bringing to the market. The question now being asked is: "Do I need a dedicated photo editing program, like Photoshop, or are the editing features now included in Lightroom and Aperture enough for my needs?"
This post will lay the basic groundwork towards making that distinction apparent, and ultimately help in making your "buy - no buy" decision. The best place to start is to understand the editing features these new programs offer. I will use Adobe's Lightroom for my examples, but similar features and tools can be found in Apple's Aperture. (These editing tools will be briefly described in this post. How and when to use each of these editing tools will not be covered in this primer.)
Shown above is Lightroom's primary workspace. The various modes of Lightroom are located at the top of the screen as Library, Develop, Slideshow, Print and Web. The previous two discussions took place in Library Mode (yellow box). This mode contains the organizational features of this program including keywording, metadata, image ranking, film strip, preview area and the image search function.
But even in this Library Mode some limited image status and editing operations are available. So, as an image is selected (click on image in central preview area or on an image in the film strip at bottom), an image histogram is displayed (shown in yellow) and several coarse editing functions become active (shown in green box). The histogram in Lightroom displays the levels for all the primary colors (red, green and blue) as well as the secondary colors (cyan, magenta and yellow) for a more detailed look at the digital make up of the selected image.
Here are the controls available for coarse image corrections in Library Mode. These controls are not nearly as elaborate as their sister function in the Develop Mode, but they do provide a quick way of making initial adjustments to individual or groups of selected images. For example, if a particular group of your images have a slight green cast, all of the images can be selected at once and their white balances adjusted to add more magenta (magenta is the opposite of green) and reduce the green cast. In the same way, a group of images that are too dark can be lightened as a group using the coarse exposure control.
To make more critical corrections, Lightroom users select the Develop Mode in the top bar of the main workspace.
Although the above picture is small, it does help orientate you to the Develop Mode workspace in Adobe's Lightroom. Here a picture was selected in the Library Mode to be adjusted. "Develop" (see green box) was selected from the top bar to reveal this image editing workspace.
That's better. In this close up view of the right-hand side of the Develop Mode workspace, the first of Lightroom's editing tools can be seen. Again a histogram is always visible and will reflect -- in real time -- any changes you make during image editing. Among the tools available are:
- White balance control (color temperature and tint)
- Recovery, fill light and blacks
- Brightness and contrast
- Presence (controlling overall clarity, vibrancy and saturation).
The editing tool bar on the right of the screen has its own vertical slider to provide access to more editing options. Here the Tone Curve is shown as well as the slider controls for Hue, Saturation, Luminance, Color and Grayscale. Again each slider control allows for very precise control and any adjustments are previewed immediately on the large center-screen image. A helpful feature is available on several controls that makes visual adjustment much easier. In the above example, Saturation is shown to be active. Notice the small circle to the left-hand side of the word Saturation. Clicking on this button converts your pointer/cursor to an on-screen saturation tool.
Here's the cursor saturation tool (within the green circle) as it appears on the large preview image. I can now be very specific about the color that I'm adjusting. In this case, the cursor is located on top of a yellow portion of the sunset. With a combination of click/hold, I can drag the cursor up or down to increase or decrease the saturation of the yellow in the entire picture. While performing this operation, the sliders in the Saturation portion of the tool bar will move to reflect precisely the change being made. Pretty cool. This feature is available with several of Lightroom's image editing tools.
The final two editing controls in the right hand options bar are "Detail" (for precisely controlling image sharpness) and "Lens Correction" (to adjust for or simulate imperfections common to lenses). The sharpening functions of Lightroom are very precise and flexible. See the Sharpening post in Part 13 of this iDarkroom primer for more information.
Immediately below the large central preview image are the controls for setting the preview image (i.e. full screen, side-by-side before and after view, etc.). In addition, a Red Eye function is available as well as all cropping and straightening functions. Cropping and straightening are very intuitive within Lightroom and performed in real time with guidelines on the large preview image.

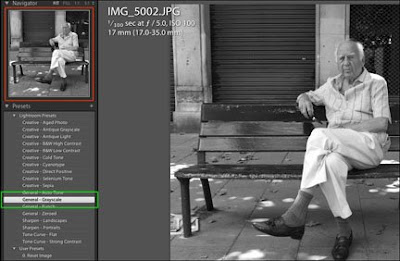
Lightroom's Pallet of Preset Effects
The final feature to be mentioned in this primer are Presets. Adobe has included a selection of predefined effects that can be applied to any image (shown above). The presets in Develop Mode are listed on the left-hand menu next to the large central preview image. As the user passes the cursor over each optional preset a small preview image is displayed (red box above) to provide visual feedback on the effect each preset will have on the selected image. In the example above, the preset labeled "General - Grayscale" is selected and all of the Lightroom corrections required to convert the selected image to a grayscale (B&W) image are applied. The result is immediately shown in the center-screen image.
Lightroom as well as Apple's Aperture - not covered here - also have significant additional features that make them a nearly universal imaging product:
- Slideshow production including music and multiple export options
- Web gallery production including a broad selection of gallery styles
- Extensive Printing Options offering unique printing formats for numerous purposes including contact sheets and fine art layouts.
They aren't!
In photo-speak, all of the actions (regardless of how dramatic or extensive) that you make during image editing are NOT applied directly to the original image. This is called non-destructive editing. Although you see the changes being made on-screen -- before your very eyes -- all corrections made are held by these programs as a set of instructions that are applied when the image is subsequently viewed, edited, exported as a new image file, viewed as a slide show, or printed. The original file is NEVER altered. The corrections are contained in a small text file that becomes permanently associated with each image file in your collection. (Consider this information as "image editing" metadata.)
Unlike the standard procedure of saving an original file, making corrections and then saving the new edited image under a new file name to preserve the original, Lightroom and Aperture save all that hard drive space and file organization chaos by maintaining a very small text file that allows these programs to apply the corrections within the program each time the image is accessed.
Then which type of program should a photographer choose -- a dedicated image editing program like Photoshop or an all-in-one software package like Lightroom or Aperture? Much of the answer is determined by the photographer and the images he/she wants (or is required) to produce. Although it's highly likely that a professional photographer's computer will have both types of programs, it is also becoming more and more frequent for these photographers to do the majority of their work in Lightroom or Aperture.
Why is this?
Most working professionals -- especially commercial and studio photographers as well as photojournalists -- have become extremely proficient at capturing a technically and compositionally accurate image in the environments they typically encounter. Their need for extensive image editing is minimal. However, their need for organizing and editing speed as well as the ability to meet tight deadlines is extremely high. So a typical workflow (under "normal" conditions) for these pros might be something like:
- Download all images from camera's storage card and generic metadata into Lightroom or Aperture
- Review all images and determine images to be used for the assignments (selects)
- Apply image-specific metadata to selected images
- Perform any corrections that can be applied to all images
- Perform any corrections necessary to specific images
- Export images in required format (with Lightroom corrections applied)
- Transmit images to their editor or client.
However, other photographers in the industry or in the non-professional ranks -- including fine art photographers, architectural photographers, photographers shooting for illustrations or advertising, etc. -- have a critical need of performing fine adjustments throughout the entire image. As a result, stand-alone imaging programs like Photoshop are a necessity in their work.
The strength of dedicated image editing programs like Photoshop is found in the almost limitless image control they provide to their users. Unlike Lightroom or Aperture where the corrections made are almost always to the entire image, Photoshop-like programs allow control over the individual components of a digital image -- down to the individual pixel level. Layers can be applied. Actions can be utilized. Cloning can be achieved. Delicate masking can be accomplished. HDR and panoramas can be accommodated. Paths can be constructed. Text can be introduced. These are some of the options not currently available in Lightroom or Aperture that are considered essentials to the work of many photographers.
In the end, the photographer must choose based on his/her image editing requirements. Because of the different strengths of each type of program, both are likely to be found in a photographer's iDarkroom.
It will certainly be interesting to watch the evolution of Lightroom and Aperture as Adobe and Apple continue to add more and more dedicated image editing program features. Who knows, we may be heading towards an all-in-one software solution.
Which would I recommend?
That's tough. But if I were just starting out -- and understanding the importance I place on keeping digital images organized and accessible -- I would probably buy either Lightroom or Aperture first. Putting organization considerations aside, the editing features of Lightroom and Aperture are extensive and certainly powerful enough for newcomers.
I would learn the ins and outs of these programs including all the image editing tools and functions. Then when I had conquered the tools and as my finances allowed, I would purchase a dedicated image editing program like Photoshop to cover the full range of my editing needs. Virtually everything I learned while using Lightroom or Aperture would transfer to shorten the learning time associated with most dedicated image editing programs.


