With almost no cost involved, today's DSLR photographers shoot more images than ever. Now the issue is the safe storage of files. Not only the data files from the camera's storage cards, but all the variations made from the files during post processing in image editing programs. Just one file might give birth to several more. Here's an example of the versions in the life of just one digital image:
- The original camera file that was copied and saved to your computer's hard drive.
- One file in the same size as the original file that has been edited, corrected and saved.
- One file that was re-sized and saved for use on a website.
- One file that was re-sized and saved to make an 8"x10" print for your den.
- One file that was re-sized and saved to appear in a magazine or newspaper.
- power surges
- jarring or dropping a hard drive
- virus attack corrupting the hard drive
- computer being stolen
- the hard drive wearing out over time from normal use
- your 8-year old types "reformat"
- alien computer abductions.
I will describe the procedure I use for backing up and storing my images. My method is not necessarily any better, but it has provided me with the confidence to know that my images are protected and always retrievable.
To start with, my primary imaging computer is an iMac. (No, that's not a recommendation, it's just the digital imaging computer I grew up with and am most comfortable using.) The current Mac OS has an automatic back up feature called Time Machine. I have a dedicated 750GB hard drive that is used by Time Machine to provide an HOURLY backup of my "changed" or new files.
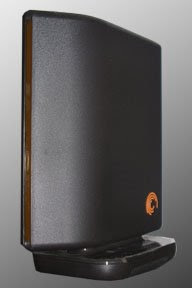
I use the Time Machine feature as a secondary backup (sort of a "just in case" copy of my files). My primary back up device is a 1 terabyte Seagate external hard drive that stores an exact copy of my computer's hard drive that is created every morning at 2 a.m. using a backup program called SuperDuper. This primary back up drive is connected to my computer by Firewire (rather than USB) to provide faster copy speeds. If you have more than one computer or are part of a network, this "image-dedicated" back up drive can also be installed to allow back up over the network.

Seagate Free Agent, 1 Terabyte External Hard Drive
Here is the process I follow for uploading and protecting the files coming from my DSLR:
In total, I have 4 copies of my original files and 3 copies of any new or altered versions I create from the original image files. Although my procedure isn't bullet proof, it does allow me to sleep better at night.
Not long ago, the expense of 750GB and 1 terabyte drives made this back up process financially prohibitive and other alternatives like storing images on Internet services were more attractive. However, the cost of large capacity hard drives has dropped dramatically and is within the reach of most photographers. Be sure to research and compare hard drives to determine the positives and negatives that real users are experiencing.
Finally, with the exception of Time Machine, these same procedures are adaptable to any PC platform and operating system.
- Using Lightroom's import feature I transfer the files from my data card to a dedicated Lightroom image folder.
- I then make a second copy of the same files into a dedicated holding folder on my external terabyte hard drive.
- I then erase the original files from my data card for re-use.
- SuperDuper and Time Machine perform their timed back ups to ensure my original and edited images are backed up on two separate hard drives.
- Over time the Holding Folder on my terabyte drive grows in size. When the folder reaches 4 gigabytes, I copy the folder to a DVD for long term storage. The files in the Holding Folder are then erased in preparation for the next series of images. I am very careful to store my DVDs in a safe environment to maximize their life.
In total, I have 4 copies of my original files and 3 copies of any new or altered versions I create from the original image files. Although my procedure isn't bullet proof, it does allow me to sleep better at night.
Not long ago, the expense of 750GB and 1 terabyte drives made this back up process financially prohibitive and other alternatives like storing images on Internet services were more attractive. However, the cost of large capacity hard drives has dropped dramatically and is within the reach of most photographers. Be sure to research and compare hard drives to determine the positives and negatives that real users are experiencing.
Finally, with the exception of Time Machine, these same procedures are adaptable to any PC platform and operating system.


