About This Digital iDarkroom Primer

This Primer on the new digital darkroom is provided on this blog to arm new DSLR photographers with the fundamental knowledge needed to become familiar with the evolving digital technologies and be able to apply them to their emerging interest in the photographic art. To read this Primer in logical order, please begin with the oldest post and read to the most current. Click HERE for Table of Contents.

Along the way, you'll find, photography tips, photography techniques and an ample dose of solid photo basics to help you feel comfortable in your digital darkroom.

A sister site, Hub's Camera, covers the fundamental mechanics of using your new DSLR camera. Then visit Hub's Photography Tips for basic but essential tips on all things photographic. Links to both of these sites can be found in the right-hand column of this page. Happy shooting!

"Hub's iDarkroom" is a non-commercial, educational service of Hubbard Camera LLC.

Thursday, September 4, 2008

Part 7 - Inkjet Printer Color Primer


At this point, you should understand the variables involved in calibrating the workflow to provide a dependable, color-managed environment. We do this homework and technical preparation to accomplish one thing -- make a print.

As a result, it seems reasonable that before rushing out to buy a printer, we need to understand the photo printer technology that's on the market today. This will be the topic of the next series of iDarkroom posts.

There is a significant difference between the typical inkjet printer used in offices to make copies, send faxes and print emails and the printers which serious amateur and professional photographers choose to make the final print that the world will see.

For all practical purposes, the home iDarkroom enthusiast will select an inkjet printer. Printer manufacturers (for the most part) have focused on inkjet printing as the technology most appropriate to serious photographic printing. This technology has exploded over the past decade to provide printers capable of producing images that rival, and in some cases exceed, the results obtained using traditional photo processing.

All inkjet printers work on the same basic principles. Minute dots of ink are placed in extremely close proximity to each other. In the most basic color inkjet printers, these dots are either cyan, magenta, yellow or black. In more advanced printers, additional colors of ink are incorporated to improve the overall color gamut of the printer (always trying to enlarge the gamut to come closer to the gamut of the camera). Colors of ink most typically added to inkjet printers are light cyan, light magenta, shades of gray, and occasionally a red, green and/or blue.

You see the magic and the technology at work when you look at a TV or monitor through a simple magnifying glass. The monitor (close up) is made up of millions of colored elements. In the case of the TV or monitor, these elements are either red, green or blue (the real primary colors). A photographic pixel is represented by one each red, green and blue element. For each frame of the image you see on TV, the elements that represent the colors in the scene are switched on. Depending on how many elements of a single color are turned on in a specific area, and which elements are turned on in the surrounding area of the scene, determines the detail and the color perceived.
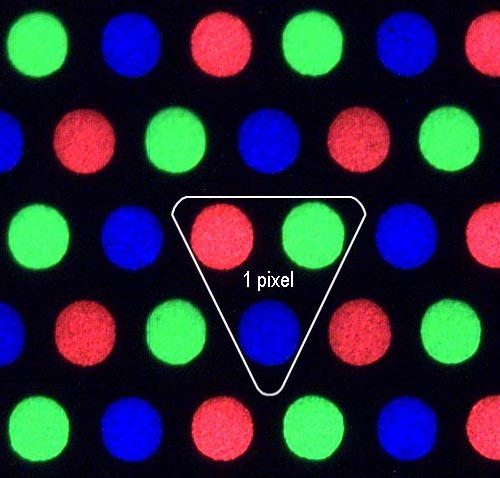

Close up of red, green and blue elements in a white area of a scene.
(from Accurate Image Manipulation by Timo Autiokari)

Because the elements are far too small for our eyes to detect individually, we perceive masses of elements. This mass (depending on which pixels are turned on) is seen as a particular shade of color. Look at the simplest example first. If only the red pixels were turned on, we would see the color red over the entire screen, of course. The same is true for green and blue. But what if all of the red elements and all of the blue elements were turned on? What color would we see on the screen? The answer is magenta (a purple-pinkish color). The same example but with only red and green elements would yield the color yellow, while 50% green and 50% blue elements would be perceived as the color cyan (sort of a turquoise color). If all elements are turned on (red, green and blue), what color would you see? If all the pixels are turned off, what color would you see? Right, black (or no color). With millions of pixels on your TV and monitor, it's possible to create virtually every color under the rainbow by selectively mixing the pixels that are "on" and "off" in relation to their neighboring pixels.

Printers work in exactly the same fashion. But instead of using the primary colors (red, green, and blue), printers use the secondary colored inks (cyan, magenta and yellow). So, what about the black cartridge in my printer? Well, in theory, the combining of cyan, magenta and yellow ink produces the color black. However, in the real world of ink and paper, combining the secondaries in equal proportions produces "mud" (a dirty dark brown). So, a black ink cartridge is added to the mix to produce a true black on paper. Second trick question. If combining cyan, magenta and yellow produces (in theory) the color black, how is the color white produced on an inkjet printer?

The answer is: It isn't.

The paper is white. So, the absence of any cyan, magenta, or yellow ink means no ink is placed on the paper, and we see that lack of ink as the white of the paper. Naturally. This is true for traditional photo processing as well. Anytime white appears in a picture, it's actually the base (white paper) that's being seen.
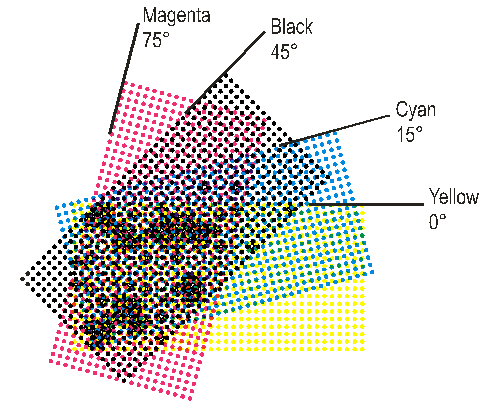


This graphic shows the cyan, magenta, yellow and black dots that create the image and colors in an inkjet print. Notice the colors overlap to produce their primary cousins (red, green and blue).


Color Imaging Math

Using the Primary Color Pallet (Red, Green and Blue)
Often referred to as RGB or Additive Color. Remember Adobe RGB?

  • Red+Blue = Magenta
  • Red+Green = Yellow
  • Green+Blue = Cyan
  • Red+Blue+Green = White

Using the Secondary Colors (Cyan, Magenta, Yellow)
Often referred to a CMYK or Subtractive printing (K stands for the extra black ink that's included in the printing system)

  • Cyan+Magenta = Blue
  • Cyan+Yellow = Green
  • Yellow+Magenta = Red
  • Cyan+Magenta+Yellow = Black

By using all the colors of the primary OR secondary color pallets in VARYING amounts all colors can be reproduced.


Here's the color wheel that photographers and photofinishers have used for centuries. From this graphic, the relationship of the primaries or additives can be seen where the red, green and blue circles overlap to produce the secondary colors -- cyan, magenta, yellow -- and finally white where all three colors intersect.


This is the color wheel that traditional press printers (i.e. commercial offset presses and inkjet printers) use to explain the relationship of the secondary or subtractive colors -- cyan, magenta, yellow. These colors overlap to produce the red, green and blue primaries as well as the color black where they all intersect.

As with other topics discussed in this series of posts for the beginning iDarkroom enthusiast, there is much more to the subject of color reproduction. But a solid understanding of these fundamental concepts will serve you well for making your first quality inkjet prints.

The next post will continue the inkjet printer discussion with the basics of Dye and Pigment inks. The decision as to whether you will use Dye inks or Pigment inks plays a major role in your printer purchase.

I hope this first basic inkjet printing post has been easy to follow. If you have any questions or comments, you know where to find me.

Powered by ScribeFire.

Monday, September 1, 2008

Part 6 - Which Digital Imaging Software Is Best?

Understand from the outset that I will not be answering this question. I will share with you the software that I use and will be most frequently cited in this iDarkroom blog. I will also let you know the reasons I selected the software I use. In the end, the choice of software is a personal decision. Fortunately, most major software producers now offer you the opportunity to try and then buy. You wouldn't buy a car before test driving it. Today, your software decisions can be made taking the same precautions.

So, I started with Adobe Photoshop long before it had any numbers or letters (CS3) after its name. We've had a long and mostly friendly relationship. There's a lot of "comfort factor" and "you can't teach an old dog new tricks" in my resistance to software change. Within the last 2 years, I have added Adobe's Lightroom to my imaging software suite. For me, this is the perfect imaging duo.

I am also an avid Macintosh user. (Strange for a guy who used to work at Hewlett Packard.) Apple's Aperture software is the competing product to Lightroom. I have absolutely nothing negative to say about Aperture. And I know photographers who are die hard Aperture users. My Lightroom decision was initially based on a self-imposed requirement. Because of the photographic instructional presentations I make, I wanted all my programs to be compatible with both Macs and PCs. At the moment, Aperture is limited to Macs only.

Knowing what I now know after using Photoshop and Lightroom together for almost 2 years, I would strongly recommend that new photographers just entering the iDarkroom take a serious look at Lightroom or Aperture as their first imaging software purchase. I make this suggestion for several reasons:
  • They both have the editing/correction features that first time users most need.
  • Both have extensive image file cataloging and management features (affectionately known as DAM -- Digital Asset Management -- in the industry).
  • They both cost less than Photoshop.
  • They are relatively easy to learn (compared to the more complex and extensive Photoshop).
  • Much of Lightroom's look and feel is shared with Photoshop.
  • Lightroom is tightly integrated with Photoshop.
The last two reasons are important if you ever decide to break into the piggy bank and purchase Photoshop. With the recent release of Lightroom 2, even more features have been added.

For me, Lightroom (and the same can probably be said of Aperture by its advocates) has made my photographic life much simpler. These programs bring instant organization and simplification to the photographer's worst nightmare -- cataloging, consistent metadata/keyword usage, and image retrieval. This DAM capability allows you to:
  • Import your images from your data card, enter metadata (see definition at end of this blog) and preview your images in record time,
  • Group images based on your criteria,
  • Sort instantly through thousands of images and be presented with only images relevant to your search by using keywords and the incorporated image rating techniques.
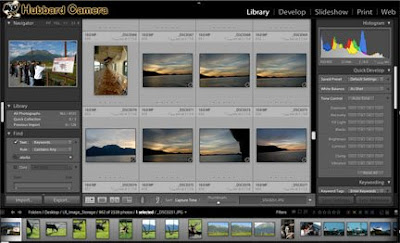
Shown here is Lightroom's Library Screen. In this case, I asked for all pictures of Alaska. I was presented with 1,000 pictures that were Alaska specific in thumbnail previews in the center of the screen - like a traditional contact sheet.

For the beginning DSLR user, keeping track of all those digital files can be overwhelming. (Consider the wedding photographer who may take 500 or more images at each event.) Here's a way to organize all your images as well as all the information about each image and to have the files always at your fingertips.

If that isn't enough these programs provide extensive image editing capabilities:
  • Histograms of each image
  • Color Correction
  • Exposure Control
  • Option to apply the same corrections to "batches" of images
  • Contrast Correction
  • Hue, Saturation and Luminance Control
  • Sharpening
  • Cropping
  • Image Straightening
  • Red Eye Reduction
  • Special effect filters/plug ins
  • and more.
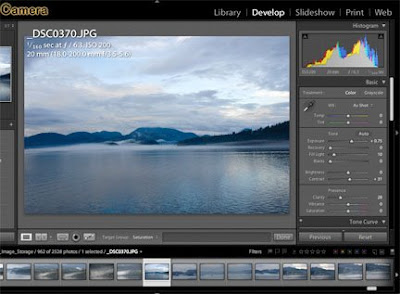
In Lightroom's "Develop" section, I have complete editing and correction control with the array of tools at the right and bottom of the image. Notice the excellent histogram in the upper right hand corner -- complete with "out of limit" indicators.

Best of all, you are working in a "non-destructive image editing" environment. Your original image is never altered and always available. Any image editing changes you make are placed in a separate file and applied to the image each time you view the preview, export the file or print the image. In this way, making multiple copies of a file as you make creative changes is no longer necessary. Lightroom "remembers" your corrections, but doesn't alter the original image in the process.

There are other features in both programs (Lightroom and Aperture) that are gravy to the main cataloging and editing features most of us require:
  • Ability to produce slide shows
  • A multitude of print output and formatting options
  • Options for using the images on the web
  • Ability to export (single or multiple files) to specified file formats and image sizes
  • And so on...
As your skills and confidence grow, you can always move to an advanced image editing program like Photoshop.

(But between you and me, because I'm pretty careful about how I compose and expose my images, Lightroom's image editing capabilities have caused me to rely much less on Photoshop. Don't tell Adobe.)

But don't take my word for it. Do the "try then buy" thing. Check out Adobe and Apple's websites for their features, specifications and photographers' testimonials then download the trial versions. And decide for yourself.

The good new is: Whether you ultimately decide on Photoshop, Lightroom, Aperture or other high end editing software, they will all have more capability and flexibility than you will need for quite some time.

Metadata definition: Metadata is text information either automatically or manually entered and included with every DSLR image. This information provides a complete history of the image (camera, model, f/stop, shutter speed, date, etc). In addition, information can be included about the photographer, captions, copyright and the all-important KEYWORDS. This data is contained within the image file and is available for use and modification by editing and cataloging software. See Part 14 of this iDarkroom Primer for a more complete explanation of Metadata.

I hope my experience with image editing software has answered some of your questions. If you have questions or comments, you know where to find me.