- Adobe Photoshop CS3 (the latest version of Photoshop at time of writing)
- PC running Vista operating system
- Hewlett Packard Pro B9180 Pigment printer (the 13"x19" printer I most frequently use).
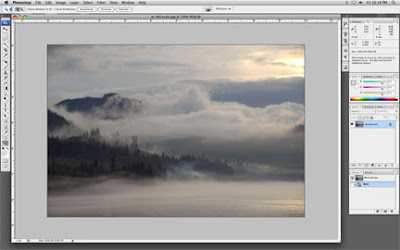
Shown below is the main Photoshop window displaying the image that will be printed in this walk through:

The following steps are used to send this image to the printer:
1. From the "File" menu, select "Print".
Notice that Photoshop CS3 has eliminated the "Print with Preview" option from the file menu. All printing tasks now take place from the "Print" selection. (For owners of HP's B9180 printer, the HP Pro Print plug-in does not work with Photoshop CS3)
2. Here’s Photoshop CS3’s main “Print” screen.
Below the preview image on this screen is a quick control for changing the orientation of the picture to either vertical or horizontal.
In the “Printer” pull down menu (top of center column) select your printer (in this case the B9180).
“Position” (middle of center column) can be used to customize the location of the image on the printed page. In this example, I've elected to "center" the picture on the page.
Check “Scale to Fit Media” if you want Photoshop to fill the page with your image. This selection is not checked in this example because the print is already sized by the photographer (10x6.6 in.) (Future posts will provide detailed information on sizing images and interpolation issues.)
3. Clicking on the “Page Setup...” button (located in the center column below the "Copies" entry box) in the main print screen above produces this sub-menu to confirm the printer and paper size selection (in this case US Letter size paper will be used). I could also have selected "Borderless 8.5x11 in." to produce a print that covers the entire page and eliminate borders. Double check the "Format for:" box to ensure your printer is selected. The "Orientation" box gives you another opportunity to orientate your image (vertical or horizontal). Finally, the "Scale" entry box on this menu allows you to determine a percentage enlargement. 100% is full size image. Less than 100% reduces the size of the image on the printed page while numbers greater than 100 will enlarge the printed image. (I generally use the sizing boxes on the main print menu to set any scaling options.)
4. After clicking on OK in the Page Setup menu above you are returned to the main print screen.
Notice that the Document Profile being used here is Adobe RGB (1998). This is the color space that was originally set in the camera's menu and subsequently used by Photoshop.
In the “Color Handling” pull down menu select “Photoshop Manages Colors”. This selection tells Photoshop to use the “Printer Profile” we specify in the next step to control the color conversion from Adobe RGB to the profile of the paper being used. Notice the top selection is "Printer Manages Colors". Today's printer manufacturers have developed print drivers with the capability to perform their own profile conversion. Although these drivers are becoming better and better, I normally allow Photoshop to manage the color conversion.
5. Now you need to tell Photoshop which ICC Profile to use by identifying the paper you are using in the “Printer Profile” pull down menu.
In this example, HP Advanced Photo Paper Glossy is being used. When the print instructions are being generated, Photoshop will seek out the ICC profile for this particular paper selection and apply it to the image being printed. Notice that every paper recommended for this printer is listed in this menu. It's apparent that each paper has its own unique printing characteristics that require their own ICC profile.
Some of the paper selections on this menu have been provided by the printer manufacturer and were placed on your computer when you installed the printer's driver software. Other 3rd party papers have been added to this menu. Most 3rd party paper manufacturers' websites provide ICC profiles for their papers to work with your printer. These profiles can be downloaded and added to Photoshop's collection of papers for your printer.
It's not unusual for professional photographers to decide that it's best to create ICC paper profiles specific to their iDarkroom environment. In this case, they use paper profiling equipment and software from companies like X-Rite to generate these unique ICC profiles.
6. Select “Perceptual” from the “Rendering Intent” pull down menu. This is the selection most often used for photographs to produce "natural" colors. Rendering Intent tells Photoshop exactly how colors that are “outside” the printer's gamut are to be brought into the gamut and positioned relative to “in” gamut colors.
7. After selecting the "Rendering Intent", click on the "Print" button (shown on the lower right in the image above). Clicking on the Print button will produce this pop up menu overlaying the main print window.
From the center pull down menu select "Paper: Type/Quality". From the options presented choose: the paper you are using, "Best" for Quality, and -- in the case of the B9180 - choose the paper source. Either "Main tray" or "Specialty Media Tray".
NOW, CLICK ON THE "PRINT" BUTTON. Your printer should start churning out that award-winning print.
Wasn't that easy? Actually, these steps become second nature after a few printing sessions and only take a few moments to complete.
Again, remember this example was specific to HP's B9180 printer. Epson and Canon printing steps are nearly identical but contain some subtle differences. Most companies attempt to help you through the process of making your "first" print with additional educational materials on their website. Here is the link to the listing of these materials on the Epson website. Canon has a similar list of support and instructional materials. Also, Epson, HP and Canon specific blogs are filled with customer experiences for nearly every printer made by these companies. These blogs can provide a wealth of tips for image making from your particular printer.
In any case, these iDarkroom printing steps are much easier, more convenient and safer than constructing a darkroom, mixing chemicals, developing film, drying film, using an enlarger, developing the wet print and drying the print required in traditional film-based photography.
Finally, understanding the steps in this walk through will serve you well regardless of the image editing software or the computer platform you are using. The process is similar for all programs and platforms.
If you have questions or comments, you know where to find me.


No comments:
Post a Comment