About This Digital iDarkroom Primer

This Primer on the new digital darkroom is provided on this blog to arm new DSLR photographers with the fundamental knowledge needed to become familiar with the evolving digital technologies and be able to apply them to their emerging interest in the photographic art. To read this Primer in logical order, please begin with the oldest post and read to the most current. Click HERE for Table of Contents.

Along the way, you'll find, photography tips, photography techniques and an ample dose of solid photo basics to help you feel comfortable in your digital darkroom.

A sister site, Hub's Camera, covers the fundamental mechanics of using your new DSLR camera. Then visit Hub's Photography Tips for basic but essential tips on all things photographic. Links to both of these sites can be found in the right-hand column of this page. Happy shooting!

"Hub's iDarkroom" is a non-commercial, educational service of Hubbard Camera LLC.
Showing posts with label PPI. Show all posts

Tuesday, December 16, 2008

Part 20 - Cropping Digital Images

Without a doubt, the first and most frequently used function in any digital imaging program is the Cropping Tool. Cropping has been basic to photography since its beginning.

Cropping determines the dimensions and boundaries of the final image. In addition, cropping ultimately determines the artistic and aesthetic placement of the central focus of any image.

Cropping occurs twice during the creation of a photograph:
  • The first crop is performed in the camera as the photographer composes the picture in the viewfinder. The photographer decides at this time the limits of the scene that will be contained within the 4 borders of the picture as well as the elements (objects) that will be captured.
  • The second crop takes place in the iDarkroom. Digital imaging programs contain cropping tools that allow the photographer to perform a final technical and artistic adjustment to define the dimensions and element contents of the final image.
A fundamental rule in photography is to crop in the camera. Photographers have long been advised to compose the image in the viewfinder as it is to appear in the final print. There are sound reasons for making this recommendation.
  • Aesthetically, cropping the image in the camera forces the serious photographer to focus on the rules of good composition and to mentally visualize the final image.
  • Technically, cropping in the camera produces a digital file that requires less cropping in the iDarkroom which interprets to sharper final prints. Excessive digital cropping and/or enlarging reduces the resolution and, consequently, the quality of the final photograph.
In the real world, photographers walk a fine line when they consider cropping. Yes, professional photographers will "pre-visualize" the final image and crop accordingly as they compose the picture in the field or studio. However, to provide some margin of error, most professional photographers will leave a small excess of the original scene on each of the four sides of the viewfinder image. The final cropping almost always takes place in the iDarkroom.

Because of the importance of cropping to photography, virtually every digital imaging program offers tools to perform this function. I will use cropping examples with Adobe's Lightroom and Photoshop. Most imaging programs will offer a tool with similar functionality.


Original picture as shot without iDarkroom cropping.

This is my sample picture for walking through Lightroom and Photoshop's cropping functions. To match the pre-visualized image of this outstanding photographer (me), some cropping refinement is required.


The area to be eliminated (or "cropped out") is shown in light brown.

Shown above is the same image with the areas to be eliminated shaded in brown. Notice: I am not concerned about the size of the final image at this stage. I am only concerned with the contents of the image appearing within the borders of the final print.


Cropping Screen with the Lightroom's Develop Module

Lightroom's cropping tool (red box above) is available from the program's Develop Module. Clicking on this tool reveals the window shown above. A free-hand cropping icon (shown in green) is available for a click-and-drag cropping. Or, handles that appear on each corner and the center of each side can be clicked-and-dragged to a new location. (Normally, I use the six handles to define the cropped area.)

An additional convenience provided in Lightroom is the inclusion of "rule of thirds" indicators. Faint grid lines that divide the picture into thirds horizontally and vertically are overlaid on the picture. The four intersections of these grid lines (shown in blue) are the "rule of thirds" points for subject placement. The locations of these points change dynamically as the crop (border lines) is moved -- nice touch for beginning and advanced photographers alike.


Lightroom's Develop Module with Crop Indicated

Here is a closer view of the Lightroom screen with the crop lines positioned. The image areas in dark gray will be eliminated (cropped) from the final digital picture. By pushing the "enter" key, the crop will be performed, and the final image appears.

Remember from our previous discussion about the non-destructive editing features of programs like Lightroom and Apple's Aperture, the original digital file is NOT being altered. The information about the crop just performed will be included along with any other corrections in a separate file and applied to this image whenever it is displayed on the monitor. The original uncropped and unaltered file is ALWAYS retrievable.

Let's compare this cropping technique to that used by Photoshop and many similar programs.


Photoshop's Crop Tool (in red)

In Photoshop, the cropping tool is always present on the left-hand tool bar as shown in the red circle above. This icon has become almost universal and looks similar in other editing programs. Clicking on this tool activates the cropping function.


The Photoshop crop is indicated and ready for execution

In the picture above, the crop tool (a click-and-drag functioning tool) has been positioned as indicated by the "marching ants" marque. After releasing the mouse button, the area to be "cropped out" will be shown in dark gray (above). Notice, much like Lightroom, that six positioning handles also appear when the mouse button is released (red circles above). Using these handles allows for final precision positioning of the borders of the crop. Hitting the "return" or "enter" key completes the cropping function.


Final cropped picture

Remember, Photoshop and similar editing programs work on a destructive editing process. In other words, the original file HAS been altered. So, perform a "SAVE AS" command and use a new file name NOW. This will ensure that the original file will NOT be overwritten and destroyed.

Simultaneous Cropping and Sizing

It is possible to perform cropping and image re-sizing at the same time with the cropping tool. Having this capability allows the photographer to specify the desired specific print size and print resolution while performing the cropping.


Original picture before cropping and re-sizing

This picture requires cropping to correctly position the subject. In addition, I know that a final print with the dimensions of 10" x 8" at 240 ppi is required. With Photoshop's cropping tool, I can perform both operations at once.
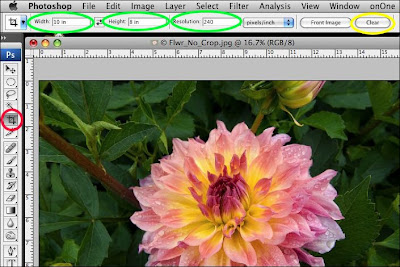

Photoshop's cropping and resizing functions

With the cropping tool selected (red circle above), I can type in specific dimensional attributes in the width, height and resolution boxes (shown within the green circles above). In this case, a width of 10", a height of 8" and a resolution of 240 ppi are typed into the boxes.

Caution: When you don't want to automatically re-size an image to specific dimensions or PPI resolution, these boxes must be blank. Using the "Clear" button (yellow circle above), will erase any specified sizing in the width, length and resolution boxes.


Areas to crop are shown in dark gray and the constrained 8"x10" print area is visible.

Now, as the click-and-drag is performed with the mouse, the crop is constrained to the proportions of 8"x10". Any crop can be accommodated when you perform this operation, as long as it conforms to the proportion of 8 by 10. The crop and re-sizing is completed by hitting the "return" or "enter" key.


Final cropped and re-sized image

Check the properties of this image and you will discover that the new cropped image is 8 inches by 10 inches with a resolution of 240 ppi. Remember to save this file under a new file name to prevent overwriting the original file. Most modern image editing programs incorporate this time-saving feature in their cropping tools.

You will find that the cropping tool is one of your best friends and most utilized tools. Because of the frequency of use, cropping will soon become second nature.

Tuesday, November 11, 2008

Part 18 - Resizing Digital Images

Like an enlarger in a traditional darkroom, images can be re-sized in the digital iDarkroom to suit the requirements of the job. The computer replaces the enlarger, and a new set of tools as well as technical jargon are used to make these necessary image conversions. This article will provide the basic information required to re-size pictures to their required dimensions and resolution.

Adobe's Photoshop will be used as the editing tool, but the lessons learned here are applicable to nearly all image editing software. As you become more proficient with your own image editing software, you'll discover that there are several ways of re-sizing an image. But the most basic and most common method will be explained in this primer.


Photoshop workspace with original image, "Histogram" and "Image Size" window

The illustration above is a portion of Photoshop's workspace and shows the picture to be used in this article, the Histogram and the "Image Size" window. The picture is taken directly from the camera with no editing applied. For my purpose, this picture requires some cropping, image enhancement and resizing. It's these steps that will be walked through and discussed.

Accessing the Image Size tool in Photoshop is straightforward.


Accessing the Image Size Tool in Photoshop

To activate the Image Size tool in Photoshop, use the "Image" drop-down menu in the main bar and select "Image Size..." (shown above).


Close up of the "Image Size" window

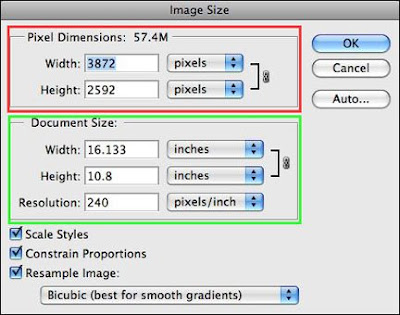
Here's the Image Size window in a size that's actually legible. Most of the explanations and procedures in this re-sizing article require the use of this Image Size tool. The information initially presented in the Image Size window provides the current technical "size" details of the image as well as entry boxes for altering any dimensions.

The Pixel Dimensions section (red box) shows the size of the image in terms of pixels. In this case, the dimensions are of an image that came directly from the camera -- 3872 pixels wide by 2592 pixels high. The Document Size section (green box) indicates exactly how large the image would be if printed right now. In this case the measurement scale is set in inches. So a print from this image would measure 16.133 inches by 10.8 inches with a resolution of 240 pixels per inch. (Document Size is the measurement for the entire printable area -- not necessarily the size of the picture on the document. More on printable area in just a moment.)

My first editing task is to crop the image to include only the portion of the picture needed for the final print.


Cropping Tool in Photoshop can be seen as the marque lines in this screen picture

Use of the cropping function will be explained in later articles, but for this example notice the cropping marque lines (the marching ants as Adobe would say) that define where my cropping will occur. (I'm taking a little image area off each end of the picture.) With the crop area visually defined, hit ENTER. The crop is completed and appears on my monitor.


The new Image Size information after the crop was performed.

Remember the original size of this image was 16.133 inches by 10.8 inches. The new cropped size (seen above) is 14.917 inches by 10.8 inches. This new dimension reflects the fact that I cropped (approximately) one inch off the ends of the original picture. The crop function has also caused the overall file size to become smaller. The number next to the words "Pixel Dimensions" indicates the current file size. This cropped image reduced the file size from 57.4 megabytes to 53.1. What happened to the other 4.3 megabytes of image information? It was trashed.

Next I SAVE the image under a new name to avoid corrupting my original image file.

Then with a little Photoshop magic I apply the color, density, saturation, etc. adjustments needed to create a masterpiece. (These steps are not covered in this article.) When done making corrections, I again SAVE the file.


Cropped image with corrections applied as seen in Photoshop

That was easy. Now I need to re-size the image for its intended use. Some of the possible uses include:
  1. Producing a print from my printer
  2. Producing an image file for reproduction in a printed publication
  3. Producing an image file that can be used in a digital slide show or on the Internet.
Each of these possible uses has unique image size parameters. It's these parameters that determine the specifications entered into the Image Size window.

1. Resizing the photo for printing on your home printer

You'll see much debate on photo blogs and forums about the resolution (pixels per inch or PPI) required to make a good print in your iDarkoom. The recommendations range from 200 to 300 PPI. I know from my career at a major photo printer manufacturer that my printer works best at 240 PPI. Using a pixel per inch setting higher than 300 has little or no impact on the quality of the final print. So, when I set up an image for printing at home, 240 PPI is my target resolution.

All I need to know now is what size I want to make the print. For example's sake, let's size the existing 14.917 inches by 10.8 inches x 240 PPI to fit on a standard 8"x10" piece of photo paper with at least a 1/2 inch border for framing purposes.


Image sizing for an 8"x10" print

First, the Golden Rule for re-sizing operations: Reducing the physical dimensions or the resolution (PPI) of an image is OK. Enlarging any of these parameters will introduce some degree of quality and visual imperfections. More to come.

In the picture above, I have entered a new value for the width of this image -- 9 inches. The height of the image AUTOMATICALLY changed to the correct proportional value -- 6.516 inches. Why did the height change when I entered 9 inches for the width? Because I checked the box labeled "Constrain Proportions". This instruction tells Photoshop to keep all sides in proportion to the original image. This relationship is shown in the green box above by the lines and padlock icon. Change one height/width dimension, and the remaining dimension changes automatically to constrain the proportions.

Since I want the image to print at a resolution of 240 PPI, I do NOT want the original resolution of 240 PPI to change. I ensure this PPI is retained by CHECKING the RESAMPLE box shown in red. If I had not CHECKED this box the resolution would also have changed in proportion to the new 9" width dimension I entered. (With RESAMPLING off and since I technically made the picture smaller than the original, the PPI number would have automatically increased to reflect the smaller image size.)

If you're asking why the height dimension shown in the Document Size area is 6.516 and not 7 inches to give me a 9"x7" print on the 8"x10" piece of paper, then please read my article entitled "Proportions in Photography" on my Hub's Photography Tips blog site.

Clicking on OK completes this re-sizing operation. Then SAVE the image, and you're ready to print.

It's time to explain "printable area" and its relationship to Document Size. In the above example, the Document Size is the "printable area". Consequently, the pixel dimensions of the image and the Document Size are exactly the same. Document Size does NOT refer to the paper being used in the printer. It only refers to the size of the complete image that will be sent to the printer.

An example should help. Many photographers make the artistic decision to print their picture on paper larger than the image they are preparing. This layout can be accomplished in Photoshop by enlarging the entire "canvas" that the picture occupies.


Canvas Size Window in Photoshop

A function called Canvas Size under the Image pull-down menu activates the window shown above. Size values can be entered in the height and width boxes to increase the size of the canvas. It's important to remember that Canvas Size function doesn't enlarge the image. Instead it adds new canvas space AROUND the existing image.

Using the example picture, I want to print the original cropped file (14.917 inches by 10.8 inches) onto a 13"x19" piece of fine art paper. I also want to control exactly where on this large piece of paper my image will appear. To make this happen I:
  • enter the new canvas width and height information into the boxes (green oval),
  • instruct the computer to place my image in the center of this new canvas by clicking on the CENTER box in the Anchor selection section (blue oval), and
  • select "white" as the color of my canvas using the canvas extension color menu
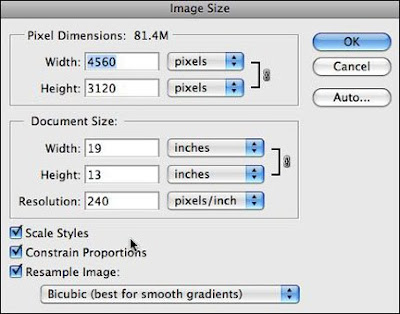
Notice that the size of this file has now increased to 81.4 megabytes -- due to adding the extra white canvas area to the file.


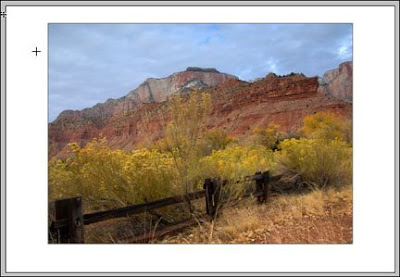
New 13"x19" Canvas

Now the monitor displays the original picture placed on a 13"x19 white canvas. The picture-only portion of the canvas was then moved upward on the canvas by one inch to give it the proper visual positioning for mounting.

One more time, open the Image Size window and the impact of changing the canvas size is apparent in the Document Size section.


Image Size information after the canvas was enlarged

The new Document Size is 13"x19" even though we know that the image on the canvas is 14.917 inches by 10.8 inches. The entire 13"x19" canvas is the printable area and is reflected in the Document Size. In addition the Image Size window reports that the file size is now 81.4 megabytes. So, (in the Image Size window) Document Size equals the actual image size only when the Canvas Size equals the actual image size.

2. Producing an image file for reproduction in a printed publication

OK, National Geographic Magazine has called and wants to use this picture in an upcoming issue. Happens every day. Right.

The magazine's specifications require an image with a PPI of 300. I SAVED my initial cropped and corrected image file, and it is currently sized at 14.917 inches by 10.8 inches x 240 PPI.

All I need to do is re-size the image to National Geographic's specifications.


Resizing for magazine publication

Opening the "Image Size..." window, I can change the single variable -- Resolution -- in the Document Size/Resolution box (shown in green) to 300. This time, however, I UNCHECKED the RESAMPLE box (see above). Consequently all three dimensional attributes are LOCKED together and the width and height of the image AUTOMATICALLY change to remain in proportion to new 300 PPI entry. (11.933 inches by 8.64 inches) Clicking OK will complete the change. Then SAVE the altered file under a new name. (Impress others by including the words National Geographic in the new file name.)

When the photo editor at National Geographic receives this file, it will be given final sizing as it is placed in their digital publishing program. All that's left to do is cash the check.

3. Producing an image file that can be used in a digital slide show or on the Internet

All of the images I use for Hub's photo blogs must be resized to accommodate the specifications of my visitors' monitors. This means that I must place images into my blogs that have a PPI of 72. I also limit the height and width dimensions of these images to a maximum value of 6 inches for either side. So now I have my parameters, let's convert the same picture for use on this blog site.


Resizing for Internet or Monitor Slide Shows

The original images I produce for these blogs are always larger than the image that is ultimately placed on the blog page. To reduce the size of my images, I use the "Image Size..." tool as shown above. This example picture is horizontal (wider than it is tall). I enter "6" in the width box. Because the "Constrain Proportions" box is CHECKED, the Height dimension automatically changes to 4.344 inches. I've also CHECKED the RESAMPLE IMAGE box to allow me to enter a new PPI of 72 in the RESOLUTION box (inside the green oval).

Clicking OK completes the action and results in an image with the dimensions of 6 inches by 4.344 inches by 72 PPI. I SAVE this file under a new name, and it's ready to upload to my blog page.

Note: The Resizing Golden Rule states that enlarging a picture beyond its original dimensions and PPI constraints is to be avoided. As has been stated in earlier articles on this blog, making this type of enlargement involves interpolating the image. To make this happen Photoshop and all image editing programs must "make up" digital data. In other words, in order to provide enough pixels to comply with your enlargement request, the software must "guess" what the missing pixels would have been. Photoshop is pretty good at guessing, but it's still just a guess.

So if you must enlarge a picture larger than its technical specification, do it sparingly and keep the enlargement as small as possible. In practical terms, if the file out of your camera is capable of making a horizontal print that's say 12"x9" without any interpolation at 240 PPI, can you enlarge the picture to 14" wide with the same 240 PPI without noticeable quality loss? The anwer is YES. Can you make a print that's 24" wide? The answer is again YES. But at this more extreme enlargement size, you will see a quality difference. In fact, you can make this picture ANY size you want, but the more it's enlarged the more noticeable the imperfections caused by interpolation will become.

As I mentioned at the beginning of this article, there are several ways to re-size pictures using today's image editing programs. The method explained here will be used for the majority of your work and is common to most imaging software.

If you have questions or comments regarding this primer on re-sizing digital image files, please let me know.

Sunday, September 21, 2008

Part 12 - From Pixels to Print

We know what pixels are. We also know that the camera doesn't produce a picture but instead a data file that describes the specific amounts of the primary colors (red, green and blue) for every pixel that comprises the picture.

So, if we really don't have a picture, how is the picture displayed on our computer monitor and then as an image from our inkjet printers? Key to understanding these technological miracles is remembering that there are two ways of reproducing the visible spectrum:
  • By using the three additive colors (also called primary) -- red, green and blue -- in nearly infinite density combinations to replicate all visible colors
  • By using the three subtractive colors (also called secondary) -- cyan, magenta, yellow -- in finite density combination to reproduce all visible colors.
The iDarkroom uses both methods:
  • The computer monitor displays images using the Primary Colors -- red, green and blue.
  • The inkjet printer produces images using the Secondary Colors -- cyan, magenta and yellow (and adds a black ink to provide contrast and a truer black than can be produced by man made cyan, magenta and yellow inks together).
Click here to review my earlier post Color Primer for more details.

The following graphic borrowed from Wikipedia is the best illustration I have found to help understand monitor vs. printer methods of creating an image as well as the relationship between pixel's per inch (PPI) and dots per inch (DPI):


Each grid represents a 10 by 10 pixel area of a much larger multi-million pixel image

Starting with the monitor

The data contained in the original image file is saved in terms of red, green and blue per pixel (a value between 0 and 255 for each primary color). As shown above, a typical sRGB computer monitor is capable of displaying all 256 values of red, green and blue at each pixel location. At 256 x 256 x 256, this means each pixel can display all 16.7 million colors that a typical DSLR's image sensor is capable of recording.

This display approach is straightforward. The only additional math or adjusting of the monitor that must be done (via the ICC profiles used by your image editing program) is to take into account the color space of the original image file. If you've set your camera, for example, to use the Adobe RGB color space, the computer will adjust the pixel color values to present the correct Adobe RGB colors on the RGB monitor.

Moving on to the inkjet printer

The "original image file" to "inkjet print" relationship is more complex for several reasons:
  • Inkjet printers use the secondary colors to reproduce the visible color spectrum -- cyan, magenta and yellow. So, RGB values contained in the original file must be converted to secondary colors as well as to the color space of the printer/paper combination.
  • Inkjet printers place "dots" of color on paper, but these dots are limited to the color cartridges in your printer. In today's photo inkjet printers, this typically means 8 different colors. For example black, photo black, matte black, cyan, light cyan, magenta, light magenta, and yellow are used by many entry level photo printers.
  • Printer resolution is expressed in terms of the number of "dots" it can place within one inch. Dots-Per-Inch (DPI).
  • Inkjet "dots" of ink are necessarily much smaller than a pixel. (Explaining why printer DPI numbers are so much larger than the PPI of the image file.) This is critical since the "dots" of ink can only be one color and one density. In order to provide the illusion of continuous tone, tiny dots of ink are placed in extremely close proximity to each other to provide the subtle shades of color required in a photograph.
In fact, the dots placed on paper by an inkjet printer are so small and so close together that our eye cannot distinguish the individual dots and colors without considerable magnification. Our brain visually blends these areas to produce a shade of color. (Much the same way modern military camouflage blends and marries into the surrounding natural colors to become part of the background.) The right hand portion of the illustration above reveals that only secondary ink dots are present and that there are many, many "dots" of secondary color in each pixel area. The higher the DPI, the more dots a printer can produce per inch and the more detailed and continuous the printed image appears.

Once again, the multiple variables involved in the process of creating a print -- camera, to monitor, to final print -- are apparent. And, once again, it's obvious with all the necessary conversions and adjustments taking place behind the scenes that -- even if we make NO image adjustment of our own -- unless the entire workflow is calibrated and in control, the odds of any picture being an accurate reflection of the original scene are slim.

But knowing what's happening throughout the workflow and taking the necessary steps to calibrate your iDarkroom are the first steps to stunning prints.

If you have any questions or comments, feel free to pass them along.

Monday, September 15, 2008

Part 11 - Basic Pixels-Per-Inch Considerations for the Printmaker

I've just returned from taking my daughter to college. On the 300 mile return trip, I spent most of my time writing and re-writing this post in my mind. The subject is PPI's (pixels per inch) role in quality image making. I also monitor dozens of Internet forums to "hear" what is most on the minds of iDarkroom beginners. The forum entries on the subject must be in the millions. Nothing seems to create more debate than PPI. Much of the debate could be eliminated if some parameters were placed on the discussion.

So... since this is my blog, I'm making the following assumptions about my readers who are just starting their iDarkroom experience as well as their quality expectations:
  • My readers are taking photographs to 1) produce prints in sizes from 4"x6" to 13"x19" that are viewed at arm's length viewing distances OR 2) to be shared as monitor images (for example, on the Internet, email attachments in digital picture frames, etc.)
  • My readers want to know how to make the best possible printed or monitor images their cameras can produce in their iDarkroom printing environment.
Believe it or not, if you agree that these assumptions represent your photography goals, we've automatically eliminated pages of unnecessary explanation. In fact, these goals are specific enough that I could end this post right now by making the following recommendations:
  • Use a pixel-per-inch setting of 240 PPI for all your serious printmaking.
  • Do not select a PPI setting that causes your computer to interpolate (guess) to produce missing pixels.
  • Use a pixel-per-inch setting of 100 PPI for images targeted for monitor display.
These are my professional recommendations and the guidelines I use every day. If that's all you wanted to hear, no need to read further. (Thanks for stopping by.) If you're a more adventurous iDarkroom beginner, read on to understand my rationale.

This post will look at the basics of PPI as it relates to printmaking in your iDarkroom. Although I will be using Adobe's Photoshop software in these examples, these image controls and decisions are common to virtually all modern digital imaging software.

Let's begin with image definitions for this post:
  • File size refers to 1) the number of bytes of data in the original file captured on your camera and saved on the data card, or 2) the number of bytes in the final image you save on your computer from your digital imaging software. (They are seldom synonymous.)
  • Image size refers to the computer dimensions of the image you see on your monitor (created from the data saved on the camera's data card). This measurement is typically expressed in terms of inches, centimeters, millimeters or pixels/points per inch (PPI).
  • PPI is the number of pixels or points per inch that make up the picture (pixel being a single picture element of image information that is displayed on a monitor or print).
To put these concepts together, consider the following picture:


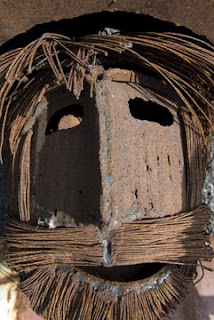
Hola, Gringo

This picture was taken with a 10 megapixel Nikon D200 and saved in RAW mode. Checking the original file as stored on my data card:
  • The RAW file size is 15.9 megabytes.
  • The dimensions of the image are 2,592 pixels wide by 3,872 pixels tall.
  • The initial resolution of the image is 240 pixels per inch (PPI).
  • The color mode is Adobe RGB (1998).
  • The bit-depth is 16 bit (more on bit depth in later posts).
These are the technical specifications of the image as originally shot and stored by my camera. When this file is opened using the RAW converter in Photoshop, the "Image Size" window can be seen below:


These measurements are now the size of the untouched image in Photoshop. If I were to print this picture without any adjustment, the resulting image would be:
  • 10.8 inches wide
  • 16.133 inches tall
  • with a printer resolution of 240 PPI.
When I save this file ("as is" with no alterations as an uncompressed .psd or .tif file), the saved file size will be 57.4 megabytes (MB). Notice the file size on my data card was 15.9 MB, but now Photoshop indicates the file size is 57.4MB. Some difference. 50% of this file size increase is due to the fact that my camera is shooting in 16-bit mode -- a topic to be discussed in later posts.

Note: Subtracting this 50% for those shooting in 8-bit mode yields a 28.7 megabyte file used in the following examples. This file is derived from the data contained in the image file on your storage card and is the result of red, green and blue information gathered by the 9.6 million effective pixels located on the sensor that collected the light information (times 3 bytes of information per pixel -- one byte each for red, green and blue).

It's at this point that opinions begin to vary regarding print quality. These opinions range from PPI settings of 150 to 600. From my professional experience with modern inkjet printers (and having worked for a printer manufacturer), I believe a PPI setting of 240 is an optimal printer setting. Visually seeing the differences in quality between a print made at 240, 300 or even 600 PPI requires a microscope. Visual differences become more and more apparent as PPI settings lower that 240 are used. So my printmaking is almost exclusively done at 240 PPI.

When I see the image information shown above, I automatically know that the LARGEST print I will make from this file is 10.8" x 16.1". Could I make a print larger than 10.8"x16.1" from this file? Certainly. And I have two methods for making a larger print.

Changing the PPI setting of the image:


Changing the PPI to 150 automatically resizes the picture to 17.28" x 25.81"

As shown in the above Photoshop "image size" window, changing the PPI from 240 to 150 provides a much larger print size while the file size remains the same. However, there are fewer pixels used per inch (90 to be exact) to reproduce each segment of the picture. As a result the printed image will appear softer (lower resolution) than the original 240 ppi print -- when viewed from the same distance. Whether this softer image is acceptable is completely at the discretion of the photographer.

Changing the image size, but not the PPI:


Here the height of the print has been changed to 25", but the resolution remains at 240 PPI

In this example, the linkage between print size and resolution has been broken by asking the computer to "Resample Image" (check box). The new 25" print size was manually entered in the "Height:" box. (Changing the height automatically changes the width proportionally.) The first sign that something unexpected is going to happen is the "new" file size. Making this size change while remaining at 240 PPI has taken the image file size from 28.7 megabytes to a whopping 69 megabytes (see the Pixel Dimension line above).

This window begs the question of "Where does the extra 40.3 megabytes of data come from?" It's a computer guess. A very intelligent guess, but nevertheless a guess. The 40.3 megabytes of new pixel information is determined through a process called interpolation. Using sophisticated and creative computer algorithms, Photoshop looks at the surrounding "real" pixels and produces pixels to "fill in the blanks" that this enlargement request has created. It's statistically unrealistic to assume that these guesses will be true to the original scene. The print resulting from this file will reveal colors, artifacts and detail (or lack of) not present in the original scene. Again, whether this print is acceptable can only be answered by the photographer.

Note: I realize this example is extreme (going from 16" original height to 25" interpolated height. It does, however, make the ramifications of interpolation obvious. Since the typical viewing distance (the distance your friends will stand when looking at your final print) is not much different between a print that's 25" and one that's 16", the effects of 40 million bytes of computer "guesses" will be apparent.

Since I know that something is lost using either method, I remain a purist by sticking with my printer's best resolution (240 PPI) and not allowing interpolation. In this way, I'm assured my print reflects the most technically accurate image my particular camera/printer combination can achieve. That's my goal.

Does this limit my final print sizes? Absolutely. However, since most of my prints are 11"x14" or smaller in size, I'm OK with this limitation. If I need a larger print, I have two choices:
  • accept the quality impact that changing PPI or Image Size produces
  • use a camera with higher resolution (more megapixels).
I have done both although I prefer the second option.

So, if you accept my recommendations (at least while you are starting your iDarkroom journey), here's a small table for determining the minimum number of megapixels required to produce the most popular color print sizes at 240 PPI:
  • 4x6 print = 1.4 megapixels
  • 5x7 print = 2 megapixels
  • 8x10 print = 4.6 megapixels
  • 11x14 print = 8.9 megapixels
  • 16x20 print = 18.4 megapixels
Finally, you can find hundreds of entries in forums around the Internet on this very topic. You've heard my preferences. After taking the time to read various opinions and weighing your options, you will ultimately have to decide the level of image quality that is acceptable in your printmaking.

If you have questions or comments, please let me know.